Adding RPC Nodes to MetaMask
The steps to add Ethereum, Polygon, and BSC RPC nodes to MetaMask are the same. This tutorial uses Polygon as an example to guide you on how to add custom RPC node service networks of Polygon Mainnet and Mumbai Testnet to MetaMask. You can add Polygon to MetaMask in a few steps.
Procedure
Step 1: Create a ZAN Account
A ZAN account is required if you want to create an API key on the ZAN platform for configuring an RPC node service network on MetaMask. For more information, see Sign Up and Log In.
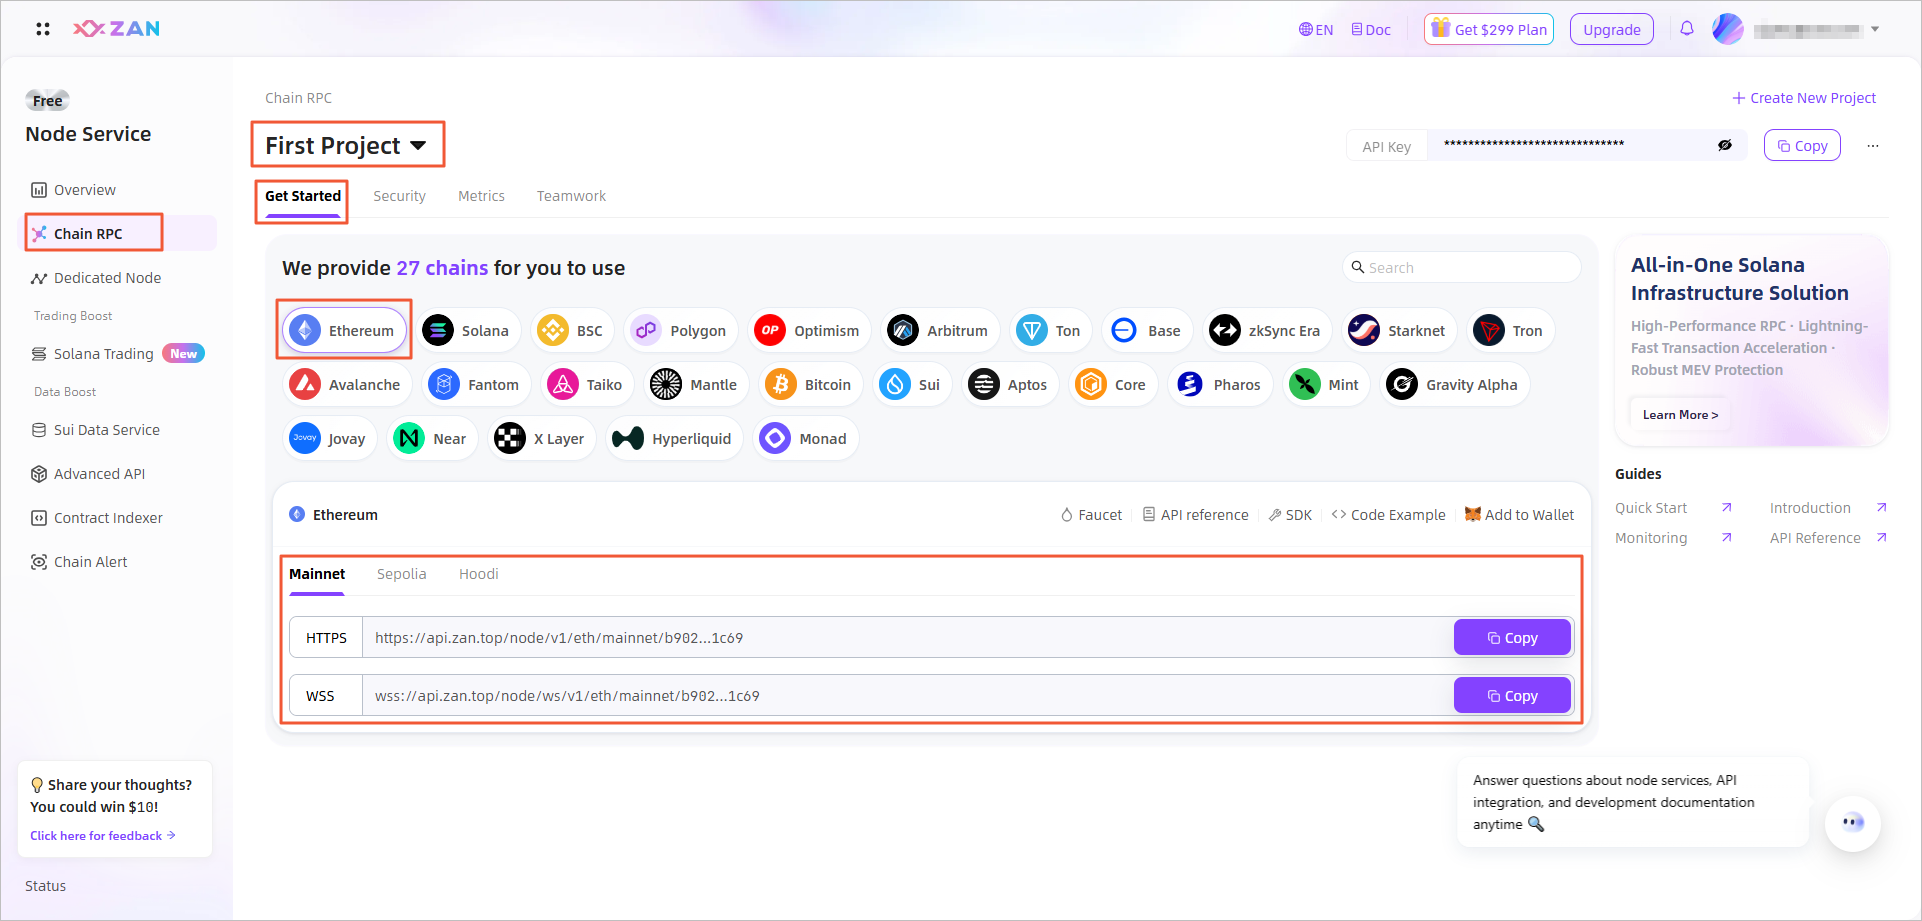
Step 2: Get Your API key
If you want to configure the RPC node service network we provide for you on MetaMask, you need to create an API key on the ZAN platform. This key is used for verification during node connection. You can create the API key on the ZAN platform, see Get Your API Key.
After the API key is created, you can get the URLs of all blockchain mainnets and testnets currently supported by the platform.
Step 3: Copy Your Network URL
After the API key is created, you can get the URLs that can be used for the RPC URL on MetaMask. By clicking the drop-down menu in the upper-right corner of the specific blockchain module, you can switch networks, such as the testnet and mainnet. Different URLs are provided for different networks. Click Copy to the right of the HTTPS URL to quickly copy the URL. For more information, see Get Your API key.
The following table lists the network URLs of the blockchains currently supported by the ZAN platform.
| Network | HTTPS URL | WSS URL | Chain ID | Symbol |
|---|---|---|---|---|
| Ethereum Mainnet | https://api.zan.top/node/v1/eth/mainnet/{apiKey} | wss://api.zan.top/node/ws/v1/eth/mainnet/{apiKey} | 1 | ETH |
| Ethereum Testnet Goerli | https://api.zan.top/node/v1/eth/goerli/{apiKey} | wss://api.zan.top/node/ws/v1/eth/goerli/{apiKey} | 5 | ETH |
| Ethereum Testnet Sepolia | https://api.zan.top/node/v1/eth/sepolia/{apiKey} | wss://api.zan.top/node/ws/v1/eth/sepolia/{apiKey} | 11155111 | ETH |
| BSC Mainnet | https://api.zan.top/node/v1/bsc/mainnet/{apiKey} | wss://api.zan.top/node/ws/v1/bsc/mainnet/{apiKey} | 56 | BNB |
| BSC Testnet | https://api.zan.top/node/v1/bsc/testnet/{apiKey} | wss://api.zan.top/node/ws/v1/bsc/testnet/{apiKey} | 97 | BNB |
| Polygon Mainnet | https://api.zan.top/node/v1/polygon/mainnet/{apiKey} | wss://api.zan.top/node/ws/v1/polygon/mainnet/{apiKey} | 137 | MATIC |
| Polygon Mumbai | https://api.zan.top/node/v1/polygon/mumbai/{apiKey} | wss://api.zan.top/node/ws/v1/polygon/mumbai/{apiKey} | 80001 | MATIC |
| Optimism Mainnet | https://api.zan.top/node/v1/opt/mainnet/{apiKey} | wss://api.zan.top/node/ws/v1/opt/mainnet/{apiKey} | 10 | OPT |
| Optimism Goerli | https://api.zan.top/node/v1/opt/goerli/{apiKey} | wss://api.zan.top/node/ws/v1/opt/goerli/{apiKey} | 420 | OPT |
| Arbitrum Mainnet | https://api.zan.top/node/v1/arb/one/{apiKey} | wss://api.zan.top/node/ws/v1/arb/one/{apiKey} | 42161 | ARB |
| Arbitrum Goerli | https://api.zan.top/node/v1/arb/goerli/{apiKey} | wss://api.zan.top/node/ws/v1/arb/goerli/{apiKey} | 421613 | ARB |
| TRON Mainnet | https://api.zan.top/node/v1/tron/mainnet/{apiKey}/jsonrpc | wss://api.zan.top/node/ws/v1/tron/mainnet/{apiKey}/jsonrpc | N/A | TRON |
| TRON Nile Testnet | https://api.zan.top/node/v1/tron/nile/{apiKey}/jsonrpc | wss://api.zan.top/node/ws/v1/tron/nile/{apiKey}/jsonrpc | N/A | TRON |
| Sui Mainnet | https://api.zan.top/node/v1/sui/mainnet/{apiKey} | wss://api.zan.top/node/ws/v1/sui/mainnet/{apiKey} | N/A | SUI |
| Sui Testnet | https://api.zan.top/node/v1/sui/testnet/{apiKey} | wss://api.zan.top/node/ws/v1/sui/testnet/{apiKey} | N/A | SUI |
| Aptos Mainnet | https://api.zan.top/node/v1/aptos/mainnet/{apiKey} | wss://api.zan.top/node/ws/v1/aptos/mainnet/{apiKey} | N/A | APT |
| Aptos Testnet | https://api.zan.top/node/v1/aptos/testnet/{apiKey} | wss://api.zan.top/node/ws/v1/aptos/testnet/{apiKey} | N/a | APT |
| Bitcoin Mainnet | https://api.zan.top/node/v1/btc/mainnet/{apiKey} | wss://api.zan.top/node/ws/v1/btc/mainnet/{apiKey} | N/A | BTC |
| Bitcoin Testnet | https://api.zan.top/node/v1/btc/testnet/{apiKey} | wss://api.zan.top/node/ws/v1/btc/testnet/{apiKey} | N/A | BTC |
| Avalanche Mainnet | https://api.zan.top/node/v1/avax/mainnet/{apiKey} | wss://api.zan.top/node/ws/v1/avax/mainnet/{apiKey} | 43114 | AVAX |
| Avalanche Fuji | https://api.zan.top/node/v1/avax/fuji/{apiKey} | wss://api.zan.top/node/ws/v1/avax/fuji/{apiKey} | 43113 | AVAX |
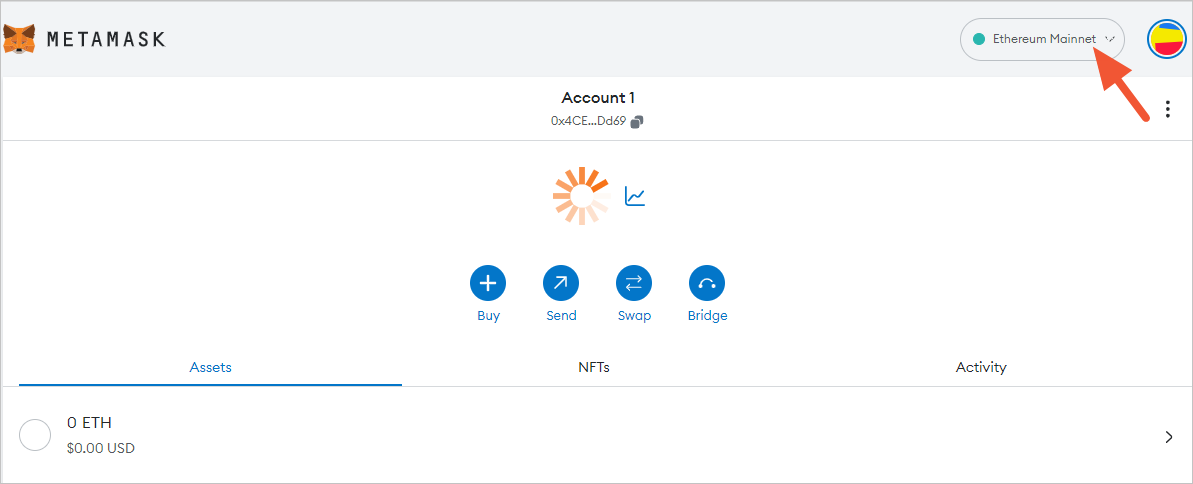
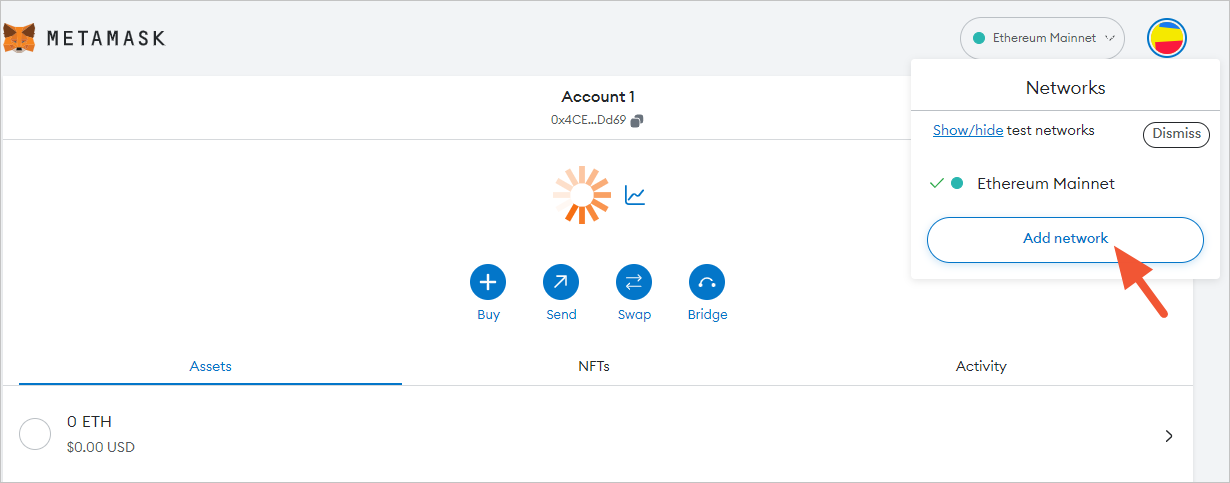
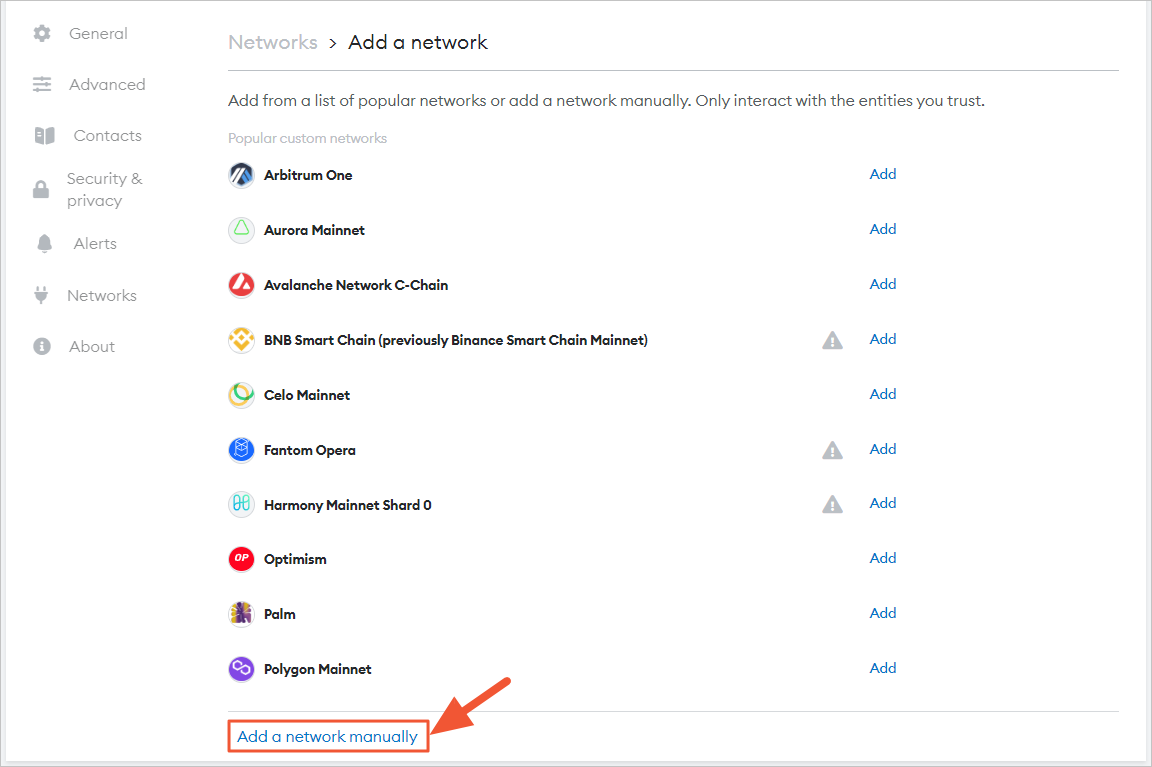
Step 4: Add the network
This section describes how to add Polygon Mainnet and Polygon's Mumbai Testnet to MetaMask.
Adding Polygon Mainnet
-
Open MetaMask and click the target network name in the upper-right corner of the window.
-
Click Add network at the bottom of the pop-up window.
-
Click Add a network manually at the lower-left part of the page to add the network.
 Note:
Note:If the mainstream network you want to add is already in the list, such as Polygon Mainnet, you can also directly click Add to add the network.
-
Enter the following network details and click Save.
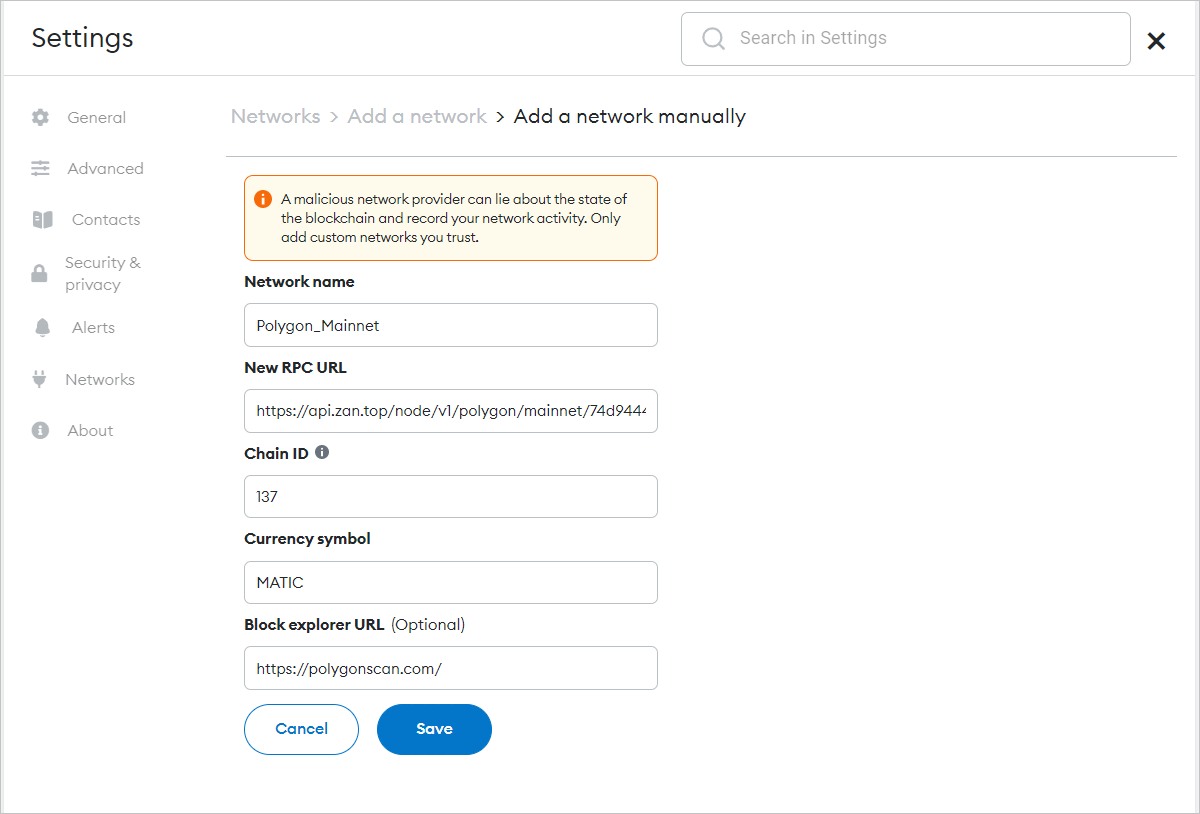
Parameter Description Network Name The name of the network, which facilitates easy identification of different networks.
If you are adding a custom network, we recommend that you use the network name, such as ETH Mainnet.New RPC URL The URL of the message server, which tells the MetaMask wallet where to send transaction requests.
Different chains have different fixed servers. Enter the network URL that you obtained in the ZAN console. For more information, see Step 3.Chain ID The chain ID, which is used to sign transactions. Different chains have different fixed IDs.
The chain ID is required for obtaining network configuration. For example, Polygon's chain ID is 137.Currency Symbol The currency symbol that MetaMask uses for the network's native currency.
For example, the currency symbol is ETH for Ethereum Mainnet, BNB for BSC networks, and MATIC for Polygon networks.Block Explorer URL The URL of the blockchain browser, which is used to check transaction details and other information.
For example, the URL of the blockchain browser for Polygon is https://etherscan.io/.
After you click Save, you are switched to Polygon Mainnet in the network drop-down list.
You have successfully completed all configurations for adding the Polygon Mainnet.
Adding Polygon's Mumbai Testnet
Mumbai Testnet replicates the Polygon's mainnet that is used for testing purposes. The steps to add a testnet are basically the same as those for adding a mainnet. The only difference lies in that the RPC node service network is different.
-
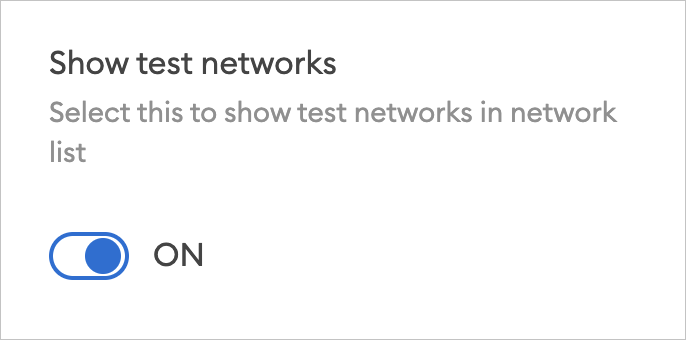
Make sure that you have turned on the Show test networks toggle.
After the toggle is turned on, all default test networks are displayed in the network list. Go to Settings > Advanced, and turn on Show test networks.
-
Enter the following network details and click Save.
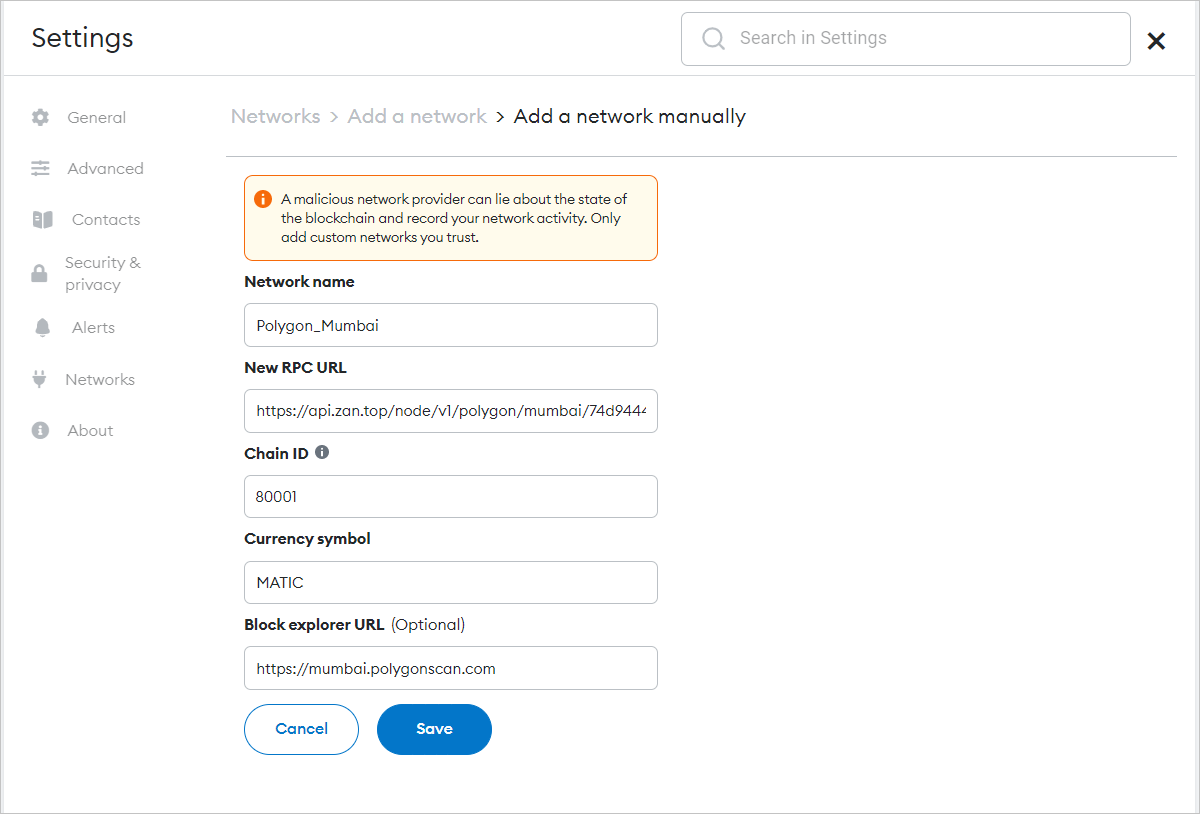
For information about how to configure the related parameters, see Step 4 in Updating Polygon Mainnet.
Updated 3 months ago