Quickstart Guide
Prerequisites
- You have submitted an application for dedicated node services by chain and have completed offline communication to confirm.
- You have signed the relevant agreements in the console and completed the payment process for customized services.
Solana RPC Node
Connection Methods
Solana RPC nodes provide two enterprise-grade connection modes:
- FastPath Direct
- Core Architecture: Client-to-node direct link with zero gateway hops
- Technical Advantages:
- Ultra-low latency with minimized network hops
- Client-managed routing & failover strategies
- Use Cases: HFT, real-time settlement, latency-sensitive workloads
- Resilient Gateway
- Core Architecture: Managed gateway with enterprise-grade controls
- Technical Advantages:
- Built-in authentication & granular rate limiting
- Multi-region auto-failover + full observability
- Minimal added latency
- Use Cases: Mission-critical production workloads
Protocol Support Matrix
| Protocol | Technical Specification | FastPath Direct | Resilient Gateway |
|---|---|---|---|
| HTTP | Standard request protocol for web integrations. | ✅Supported | ✅Supported |
| WS/WSS | WebSocket-based real-time communication for event streaming. | ✅Supported | ✅Supported |
| gRPC | High-performance RPC framework for complex data exchange. | ✅Supported | ❌Unsupported |
Note:gRPC unsupported in Resilient Gateway mode due to bidirectional streaming constraints.
Step 1: Add Source IP
After the platform deploys the Solana RPC Node for you, you need to log in to the ZAN Node Service Console to configure the Source IP for your Solana RPC Node in order to obtain whitelist access to the Solana blockchain.
Follow the steps below to swiftly get started with your first transaction on the Solana RPC Node.
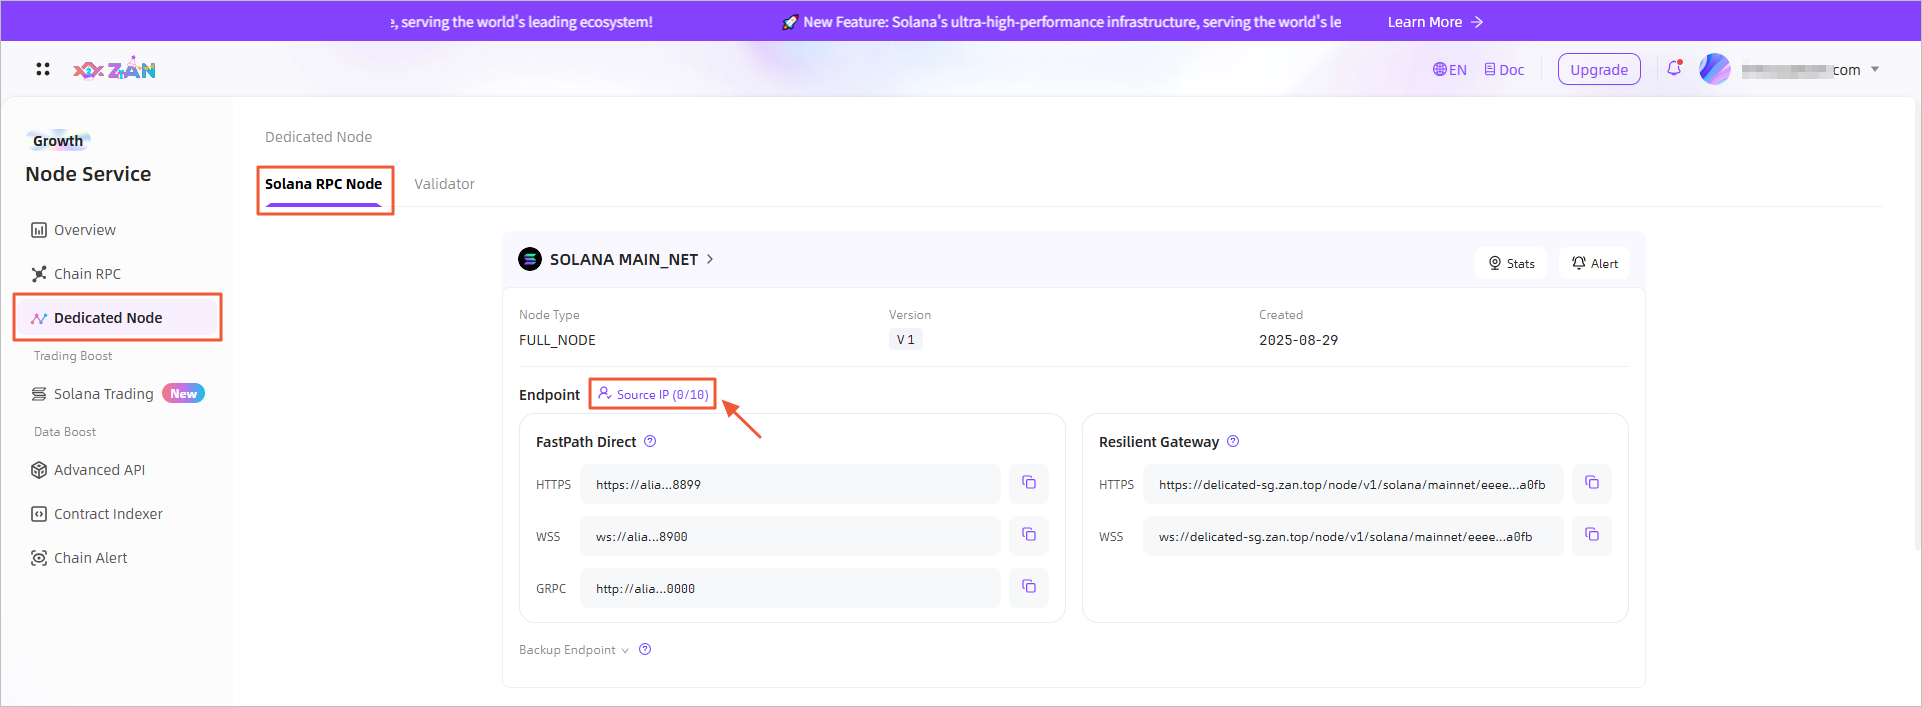
- Log in to the ZAN Node Service Console and click on Dedicated Node in the left navigation bar.
- Under the Solana RPC Node tab, locate your target node and click on its Source IP.\
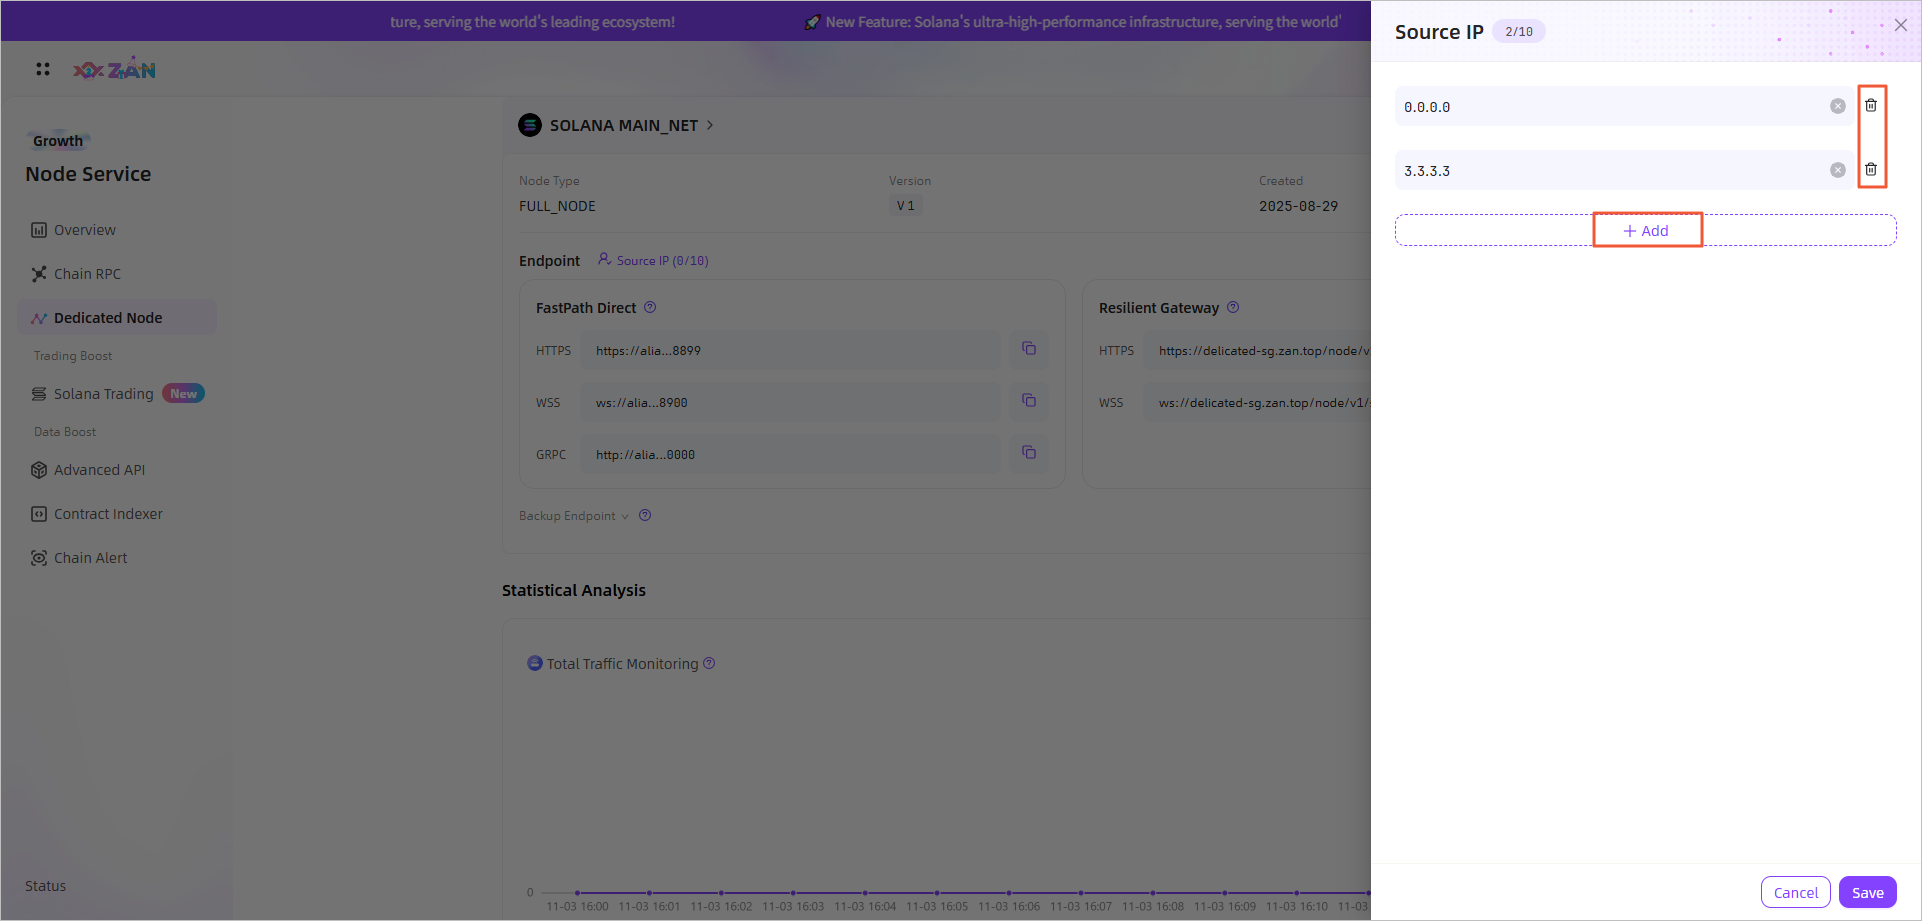
- In the side drawer that appears, click the Add button to insert a new line of Source IP configuration.\
 \
\
Note:Each Solana RPC Node can be configured with up to 10 Source IPs.
- After configuration, click the Save button at the bottom right to save your settings.
Note:
Only IP addresses that are correctly configured can successfully call the interfaces provided by the Solana mainnet.
Step 2: Select and Copy Endpoint
Select a calling option, such as HTTP, WS, or gRPC, then click the copy icon next to the corresponding URL to copy it instantly.\ 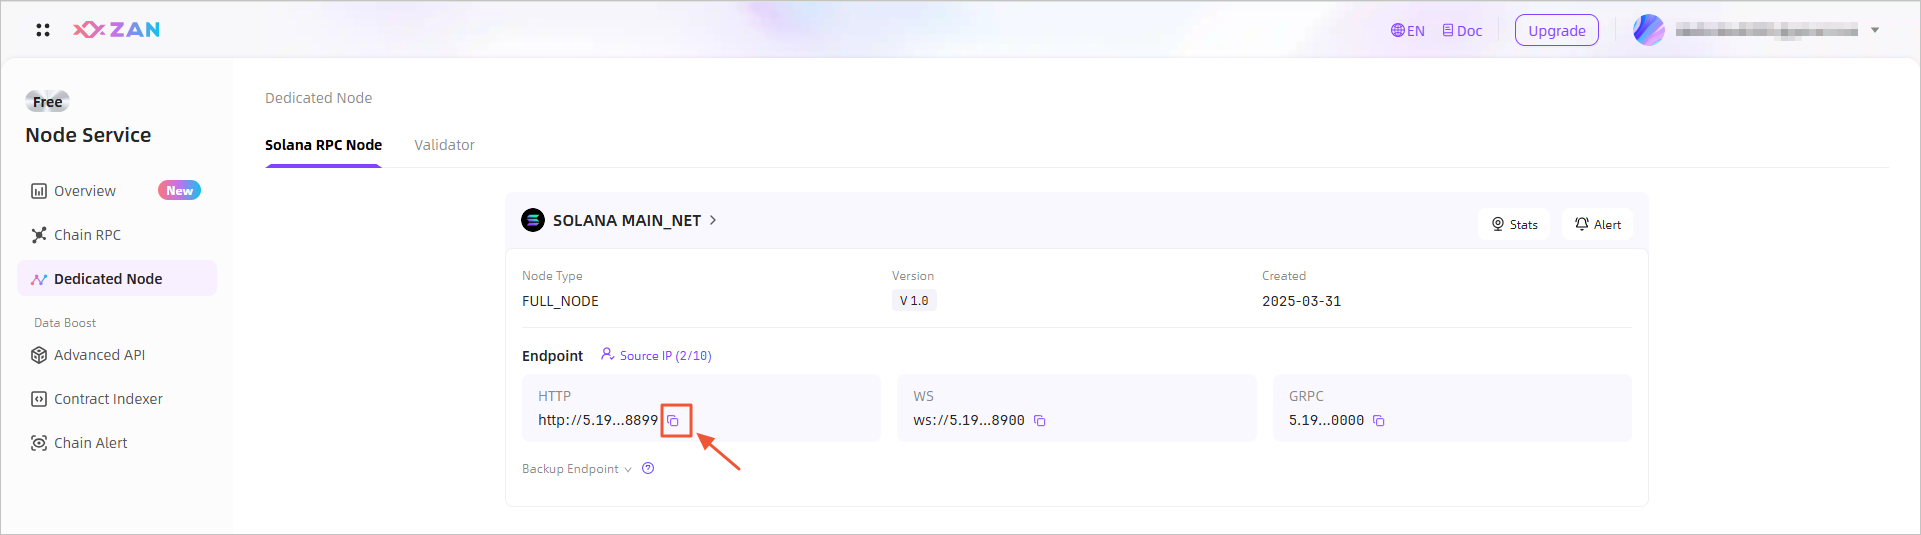
In case of node reboot or failure, click the expand icon next to Backup Endpoint, select and copy the URL under the target calling option to use the Backup Endpoint for emergency calls.\ 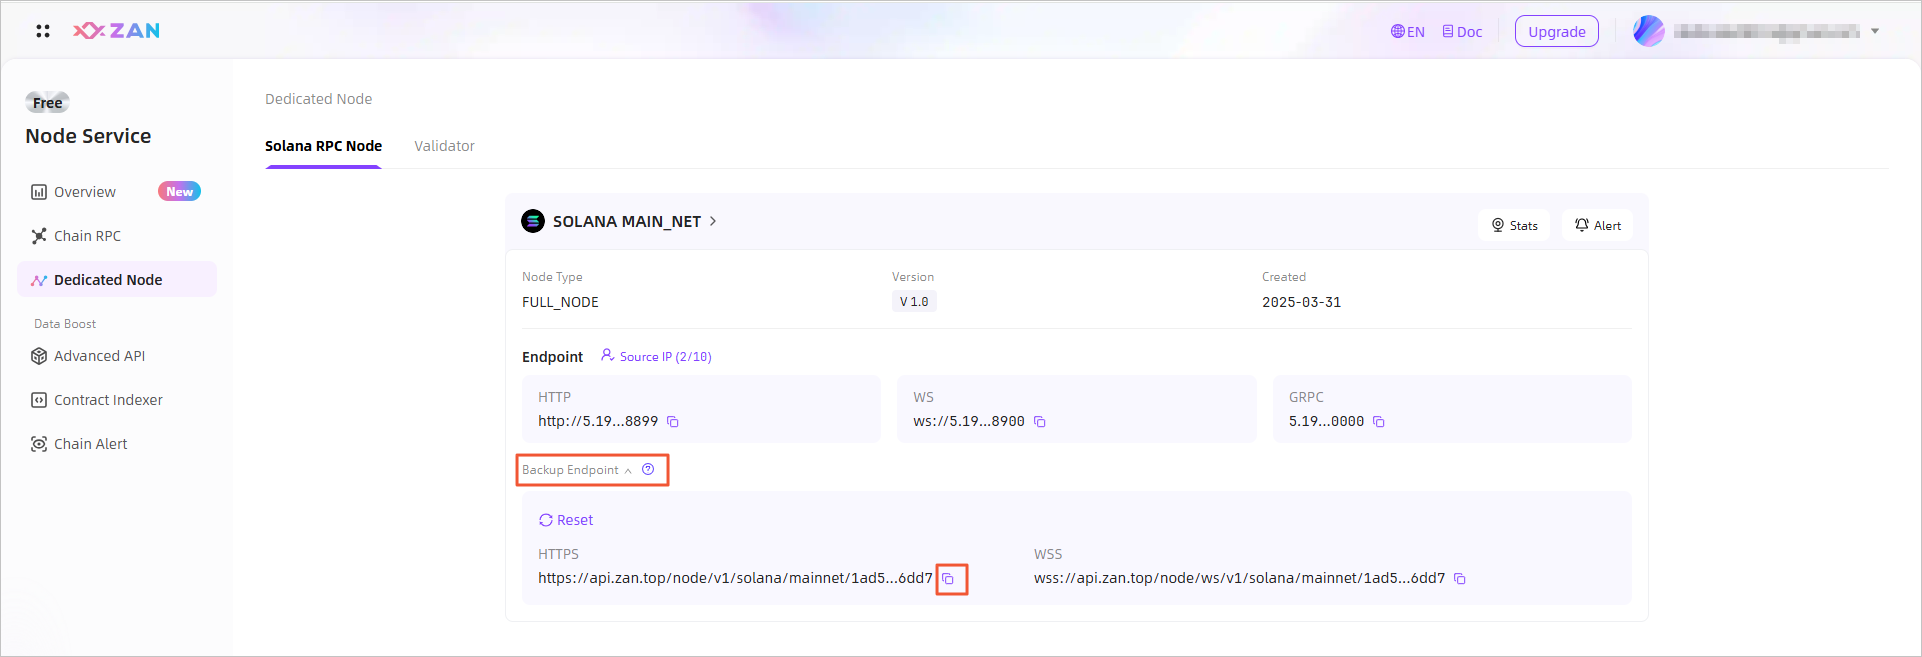 \
\
Note:The backup node is only recommended for emergency use due to its many usage restrictions. Additionally, backup nodes support calls only via HTTPS and WSS protocols.
Step 3: Make API Call
- In your local application, use the configured Source IPs to call through the interfaces provided by the Solana mainnet.\

- After a successful call, you can go to the details page of the Solana RPC Node to monitor the node's resource usage and traffic usage. We also support setting alarm notifications for key metrics, for more details, see Monitoring > Solana RPC Node.
RPC Node
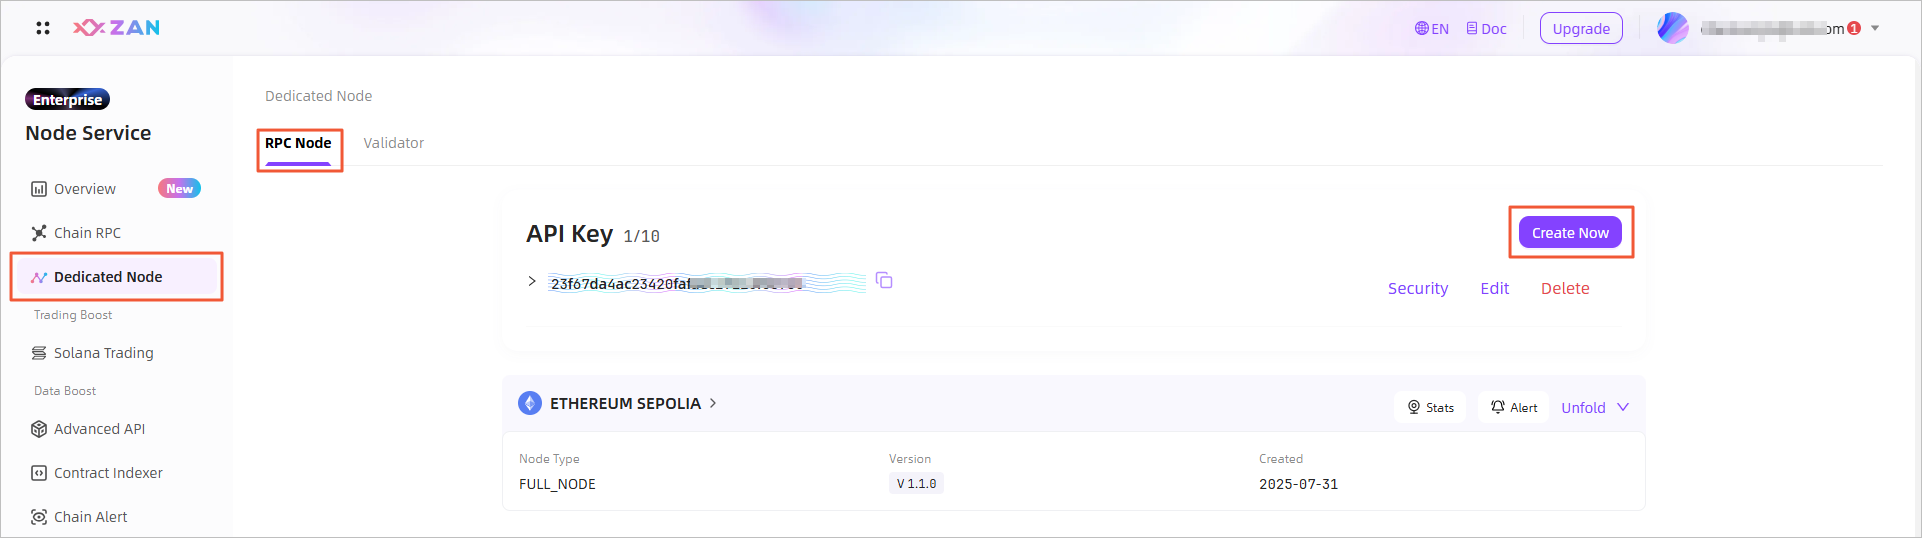
Creating an API key
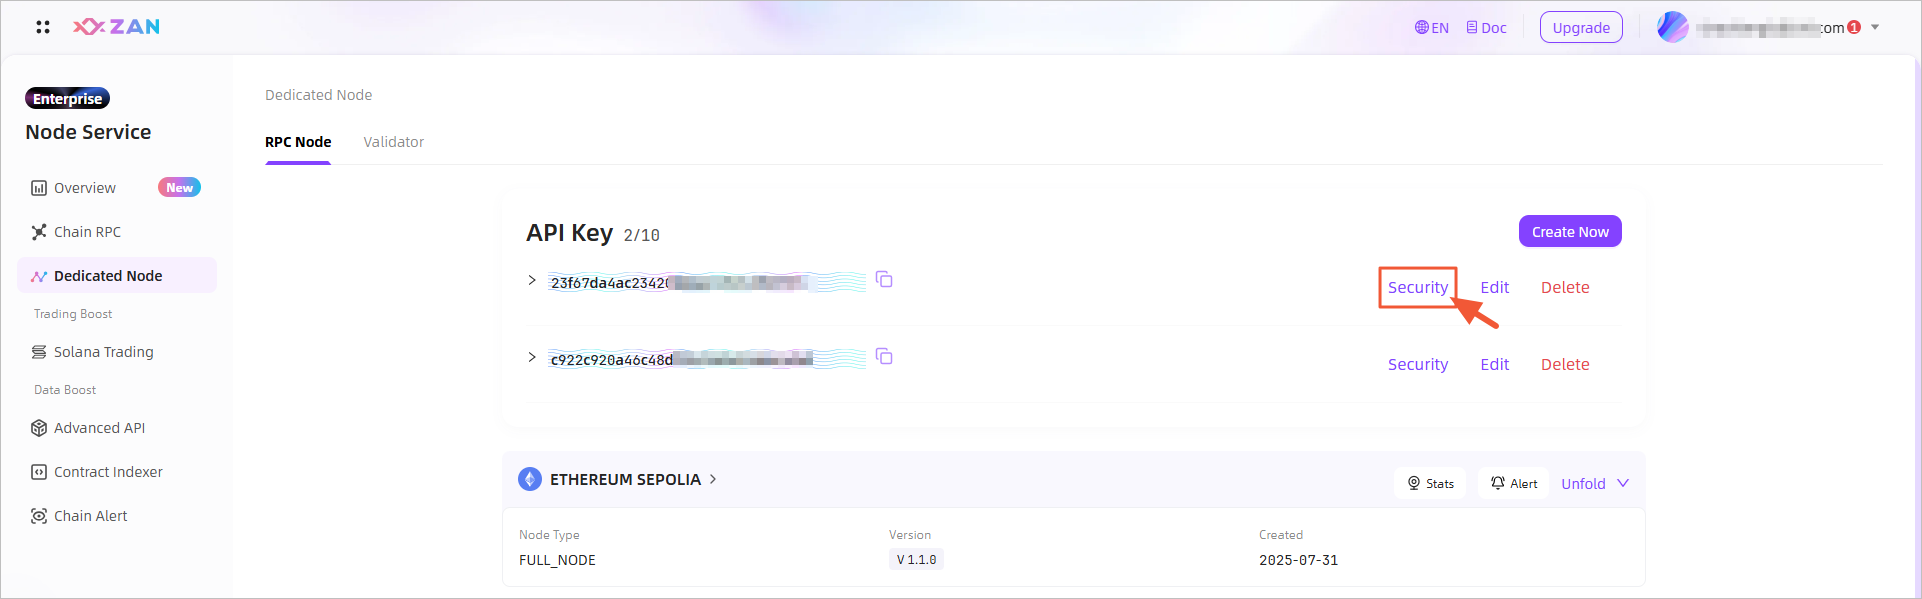
Customers who have availed themselves of customized node services can create a maximum of 10 API keys on the Dedicated Node page.
-
Log in to the ZAN Node Service Console and click on Dedicated Node on the left navigation bar.
-
On the RPC Node tab,click Create Now at the top right of the Dedicated Node page.
-
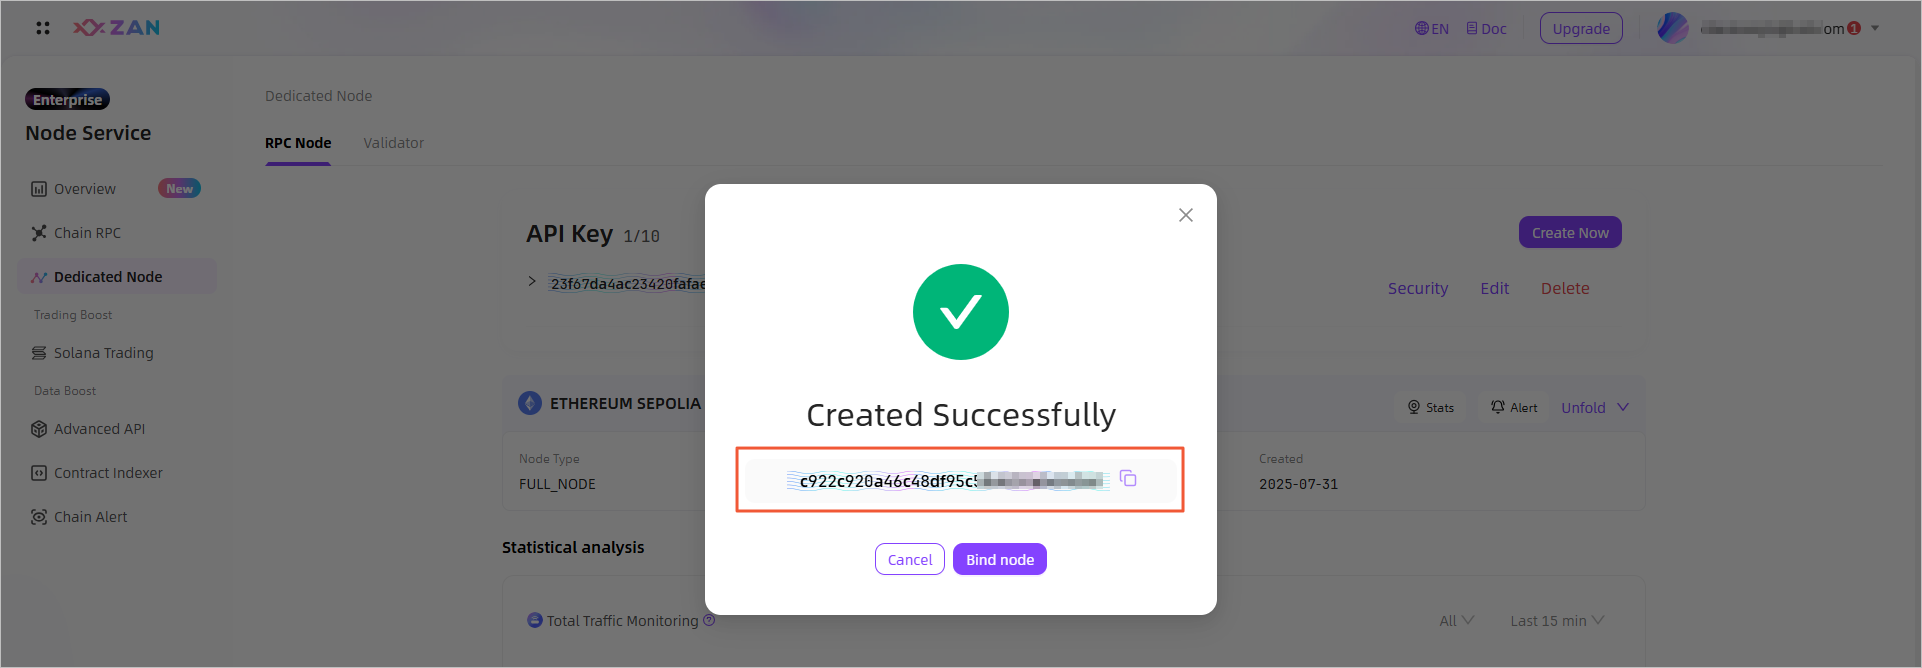
Obtain your AKP key in the pop-up window.
-
Bind node.
Click Bind node, to associate the API key with your dedicated node or QPS-billed shared node.\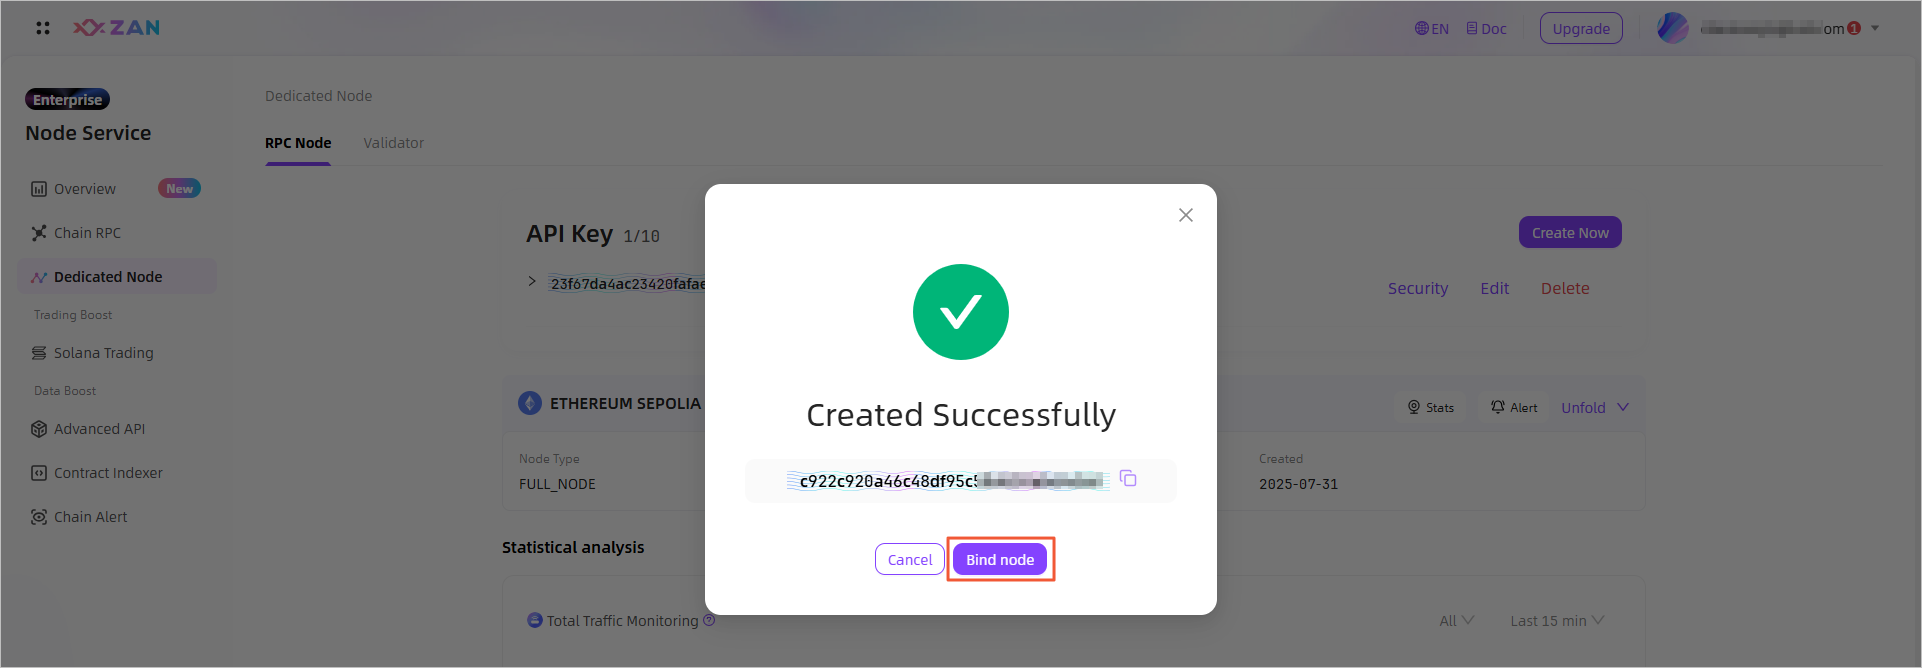
Once the binding is completed, you can use the API to transact on the target blockchain where the API key is bound, as well as to query on-chain information.
API key Security: Best Practices for Developers
You can configure the settings to secure API key-based connections.
The security settings for the API key connection of a customized node are similar to those for RPC nodes. You can refer to the Security settings of RPC nodes.
You can configure the following settings to secure API key-based connections:
- Configuring secret-based two-factor authentication
- Setting a contract address allowlist
- Setting a source allowlist
- Setting a domain allowlist
- Setting an API request method allowlist
- Setting the creditt cost limit
- Setting the API RateLimits
Editing API keys
- Function Description:
Manage the binding relationships between API keys and RPC nodes, supporting modification of node configurations associated with existing API keys. - Operation Path:
Dedicated Node → RPC Node → Select target API key to edit.

Note:API keys and nodes now support many-to-many binding relationships.
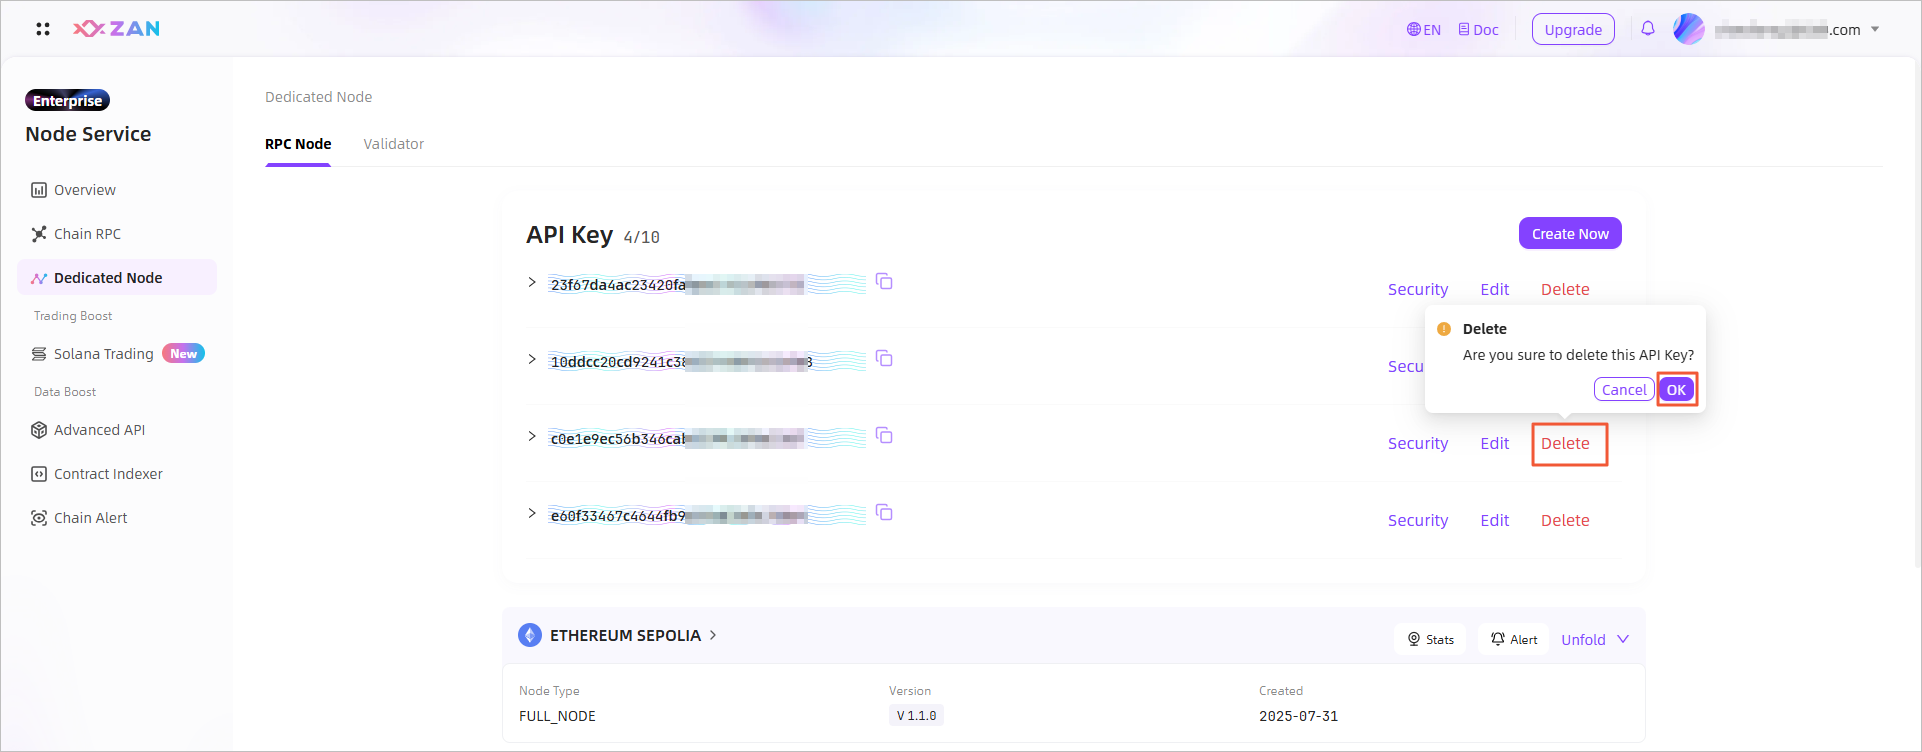
Deleting API keys
In the API key management interface, locate the key you want to delete, and confirm the deletion. Ensure all node bindings have been released before removing it.
Updated 3 months ago