Quickstart Guide (Free)
Making your first JSON-RPC request to ZAN Node Service using cURL in 5 minutes
Overview
For Web3 application developers, the cost of building nodes on public blockchains is relatively high, and the stability and security of the node running cannot be ensured. After learning this chapter, you can gain:
- Quick connection to the world of Web3
You can access all supported public blockchains by creating an API key, without additional configurations. - Dual support for HTTPS and WSS
Connections can be established over HTTPS and WebSocket Secure (WSS). This can meet the different requirements of applications.
Preparing
- A ZAN account, If you have not registered, see Sign Up and Log In.
- A terminal with
curlinstalled - Understand free quota and basic security configuration, see Plan Specifications.
Start for Free
After completing the registration and login for a ZAN account, you can start for a free plan immediately! On the overview page of the node service, you can quickly obtain the API key for your first project and use this API key to connect to the node service's public blockchain for an experience.
Step1: Get Your API key
To streamline the process for new users, the platform automatically creates a project named "First Project" for each newcomer. You can directly access the project's Chain RPC page to obtain the API key necessary for connecting to the node service blockchain.
Create a new project?Upper right → Create New Project → Enter name. For detailed operations, refer to the Manage Projects.
-
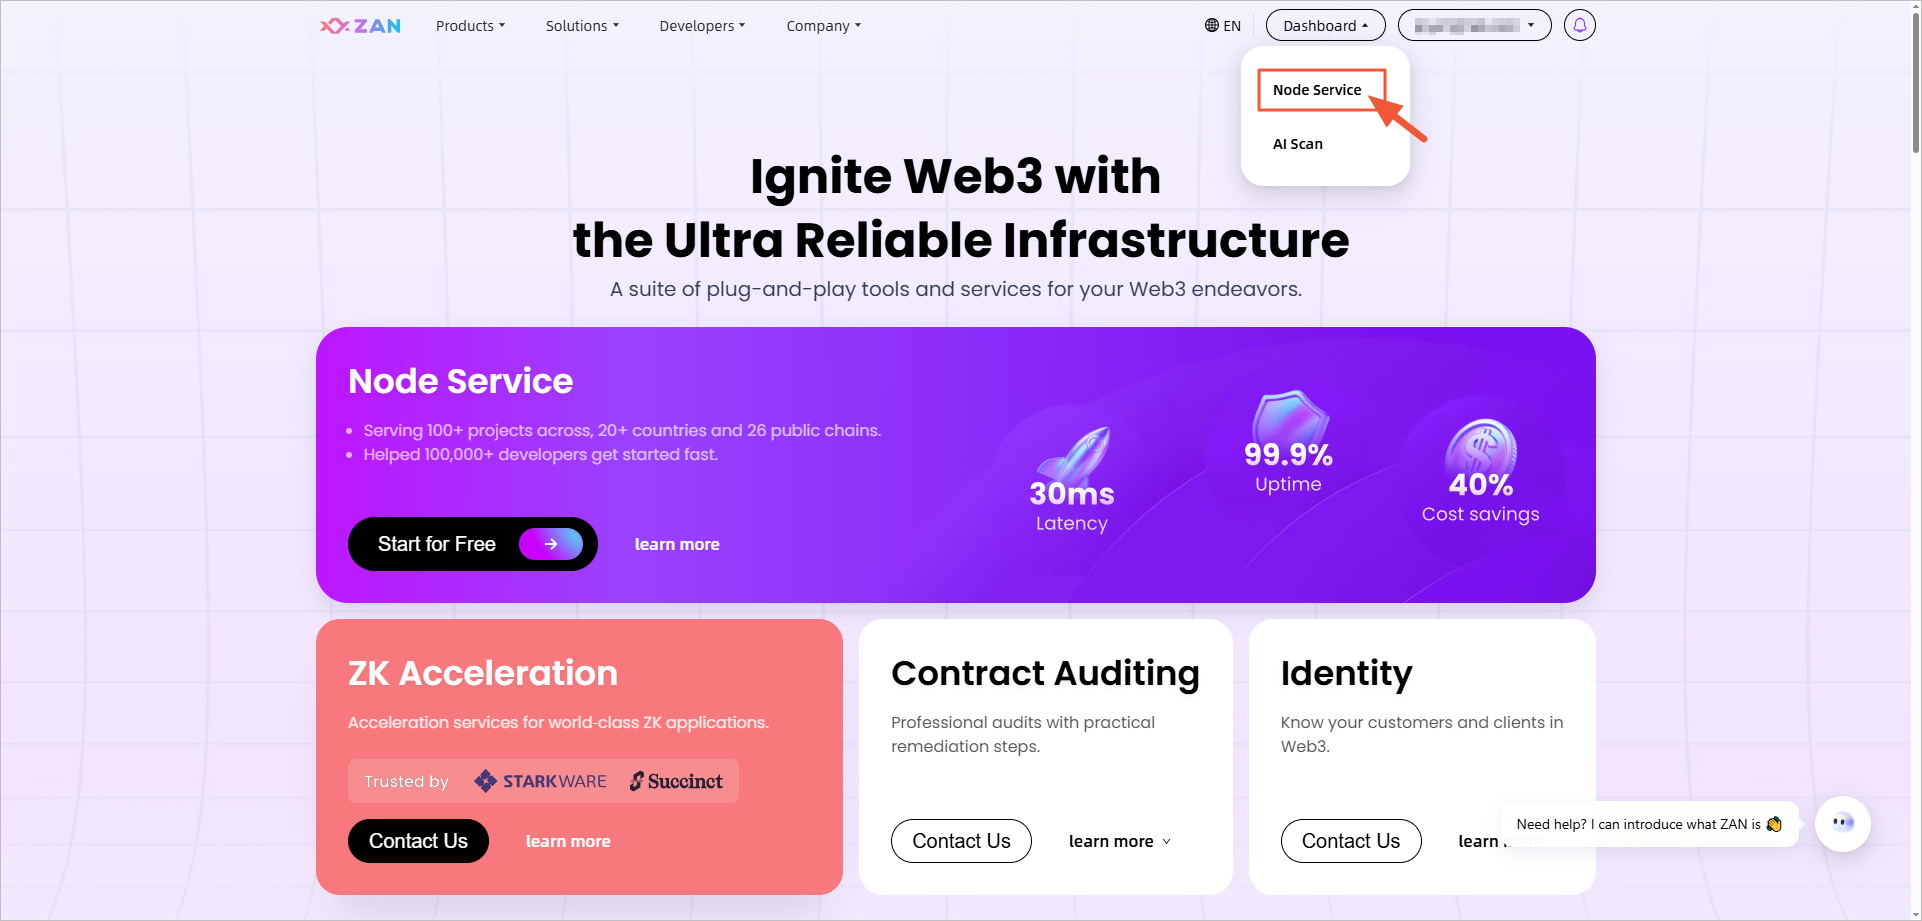
Visit ZAN official platform, Click top-right Dashboard → Node Service.
-
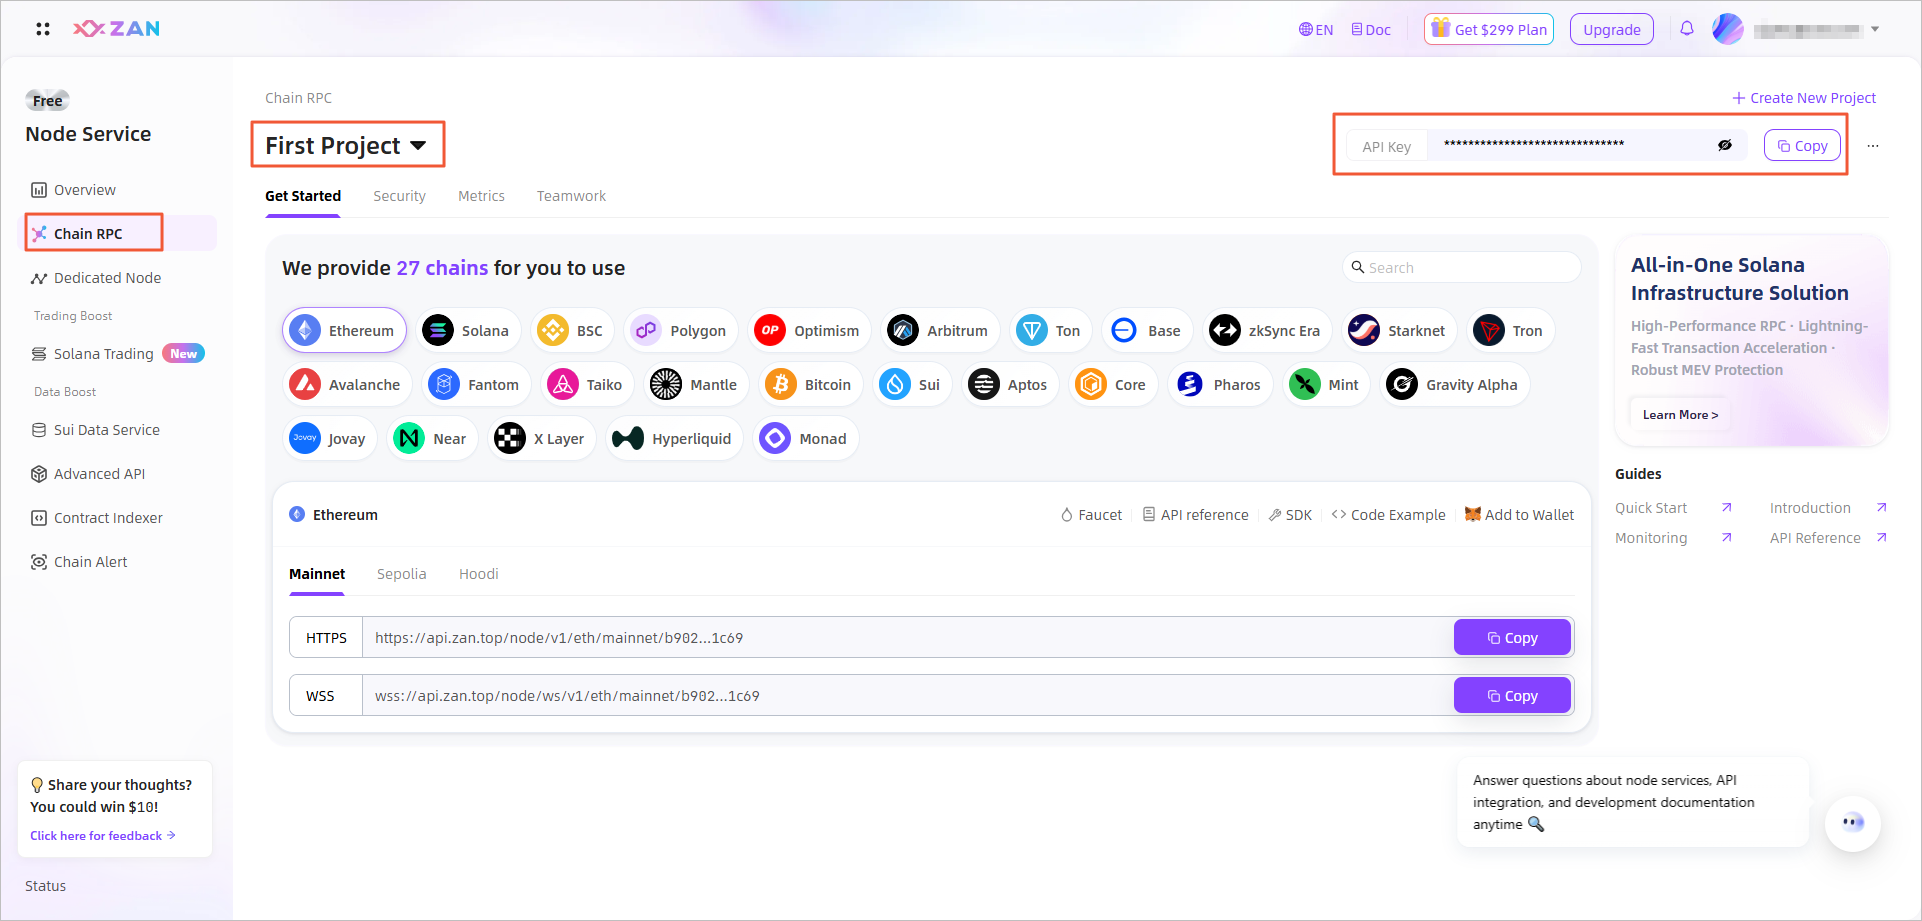
Access the default project First Project, Copy the API key from the top-right corner.
-
Get Started tab → Select target chain & network, get endpoint URL for your requests.
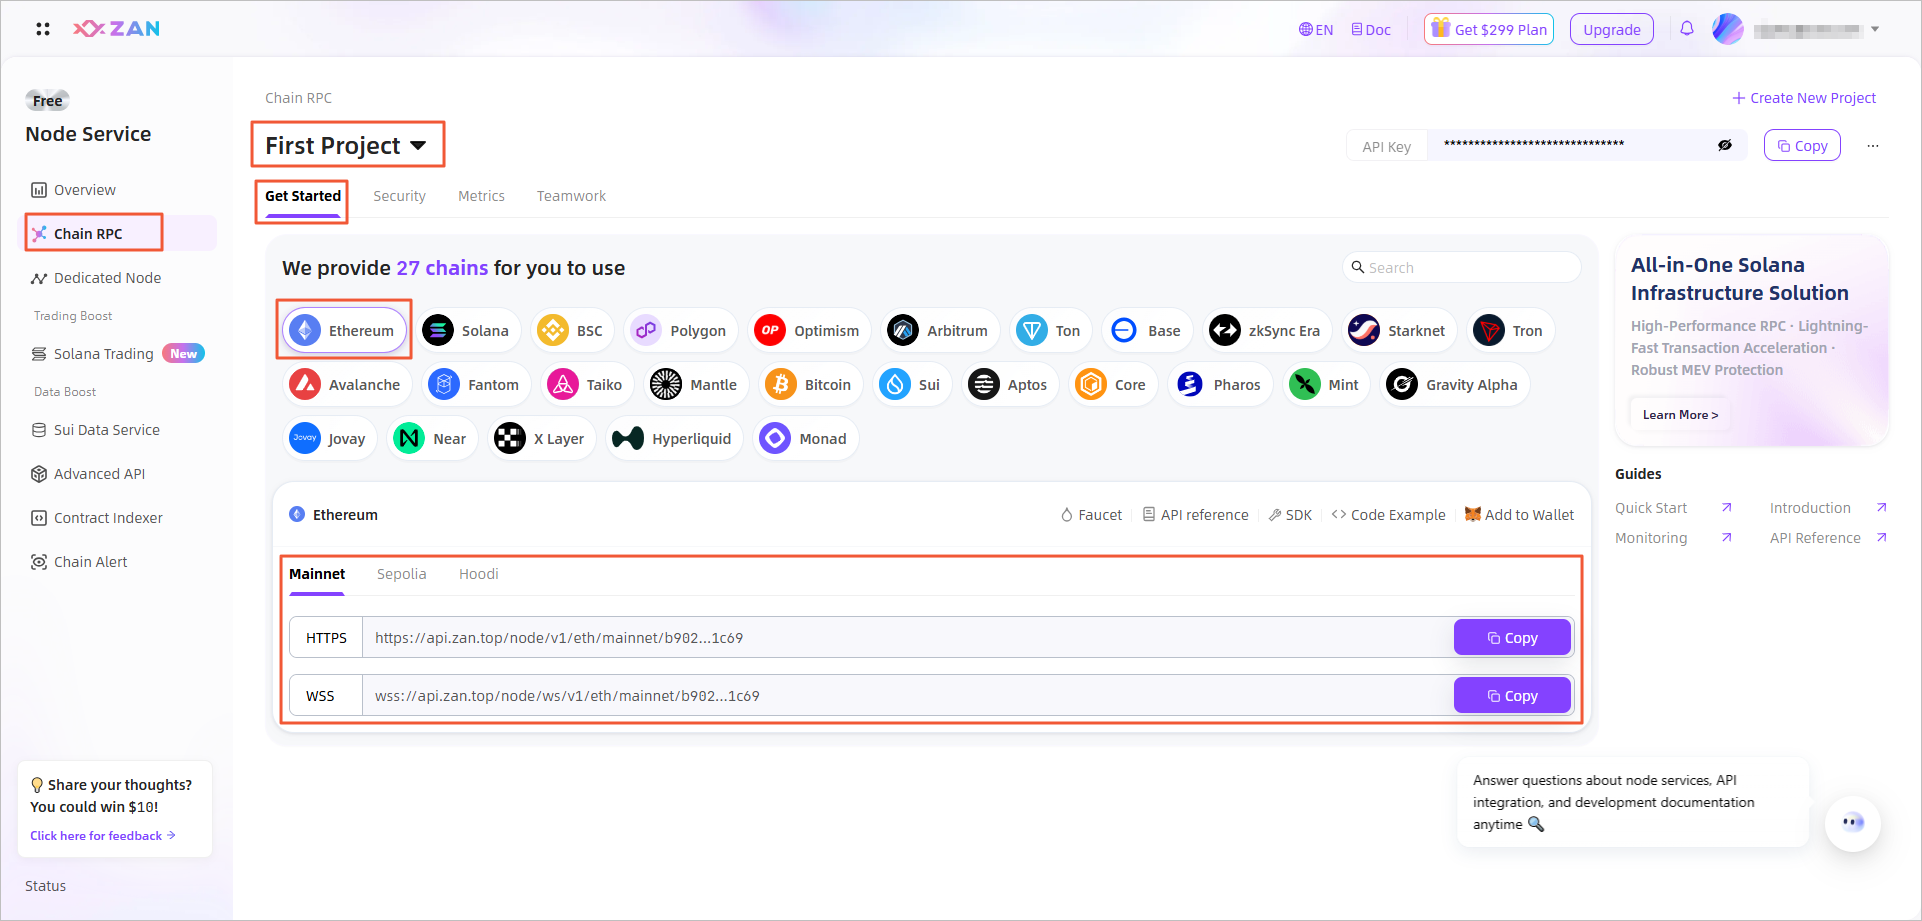
This URL address is composed of the node service IP routing, ecological information, network information, and the user API key, which is run by zan. Sample Endpoint (Ethereum):
https://api.zan.top/node/v1/eth/mainnet/{apiKey}wss://api.zan.top/node/ws/v1/eth/mainnet/{apiKey}Note:Get Started tab details: See More introduction.
Step2: Test Connectivity
This section shows you how to send an get_blockNumber request to Ethereum mainnet with cURL and verify the response. Two verification methods are supported:
- Local Terminal Experience - Quick command-line verification
- Official Interactive Testing - Web interface visual verification
Method 1: Local Terminal Verification
-
API key Configuration
Set API key as environment variable (recommended).
export ZAN_API_KEY="YOUR_API_KEY" -
Send your first request.
Query the latest block number on Ethereum mainnet using
eth_blockNumber:curl -X POST "https://api.zan.top/node/v1/eth/mainnet/$ZAN_API_KEY" \ -H "Content-Type: application/json" \ -d '{ "jsonrpc": "2.0", "method": "eth_blockNumber", "params": [], "id": 1 }'import { JsonRpcProvider } from "ethers"; const provider = new JsonRpcProvider( `https://api.zan.top/node/v1/eth/mainnet/${process.env.ZAN_API_KEY}` ); const blockNumber = await provider.getBlockNumber(); console.log("Latest block:", blockNumber);import os, requests api_key = os.environ["ZAN_API_KEY"] resp = requests.post( f"https://api.zan.top/node/v1/eth/mainnet/{api_key}", json={"jsonrpc": "2.0", "method": "eth_blockNumber", "params": [], "id": 1}, timeout=10, ) resp.raise_for_status() data = resp.json() print(f"Latest block: {int(data['result'], 16)}") -
Check the response.
Successful Response:{ "jsonrpc": "2.0", "id": 1, "result": "0x587e4d4" }Reading the responseThe
resultfield is a hex-encoded block number. Convert it:parseInt("0x587e4d4", 16)→92,864,724. You can use this method to query any EVM-compatible chain — just replaceethin the URL with the target chain slug (e.g.,polygon,arb,base).
Method 2: Official Interactive Verification
-
Access API Reference.
Navigation Path: ZAN Platform → Developers → API → Target method page.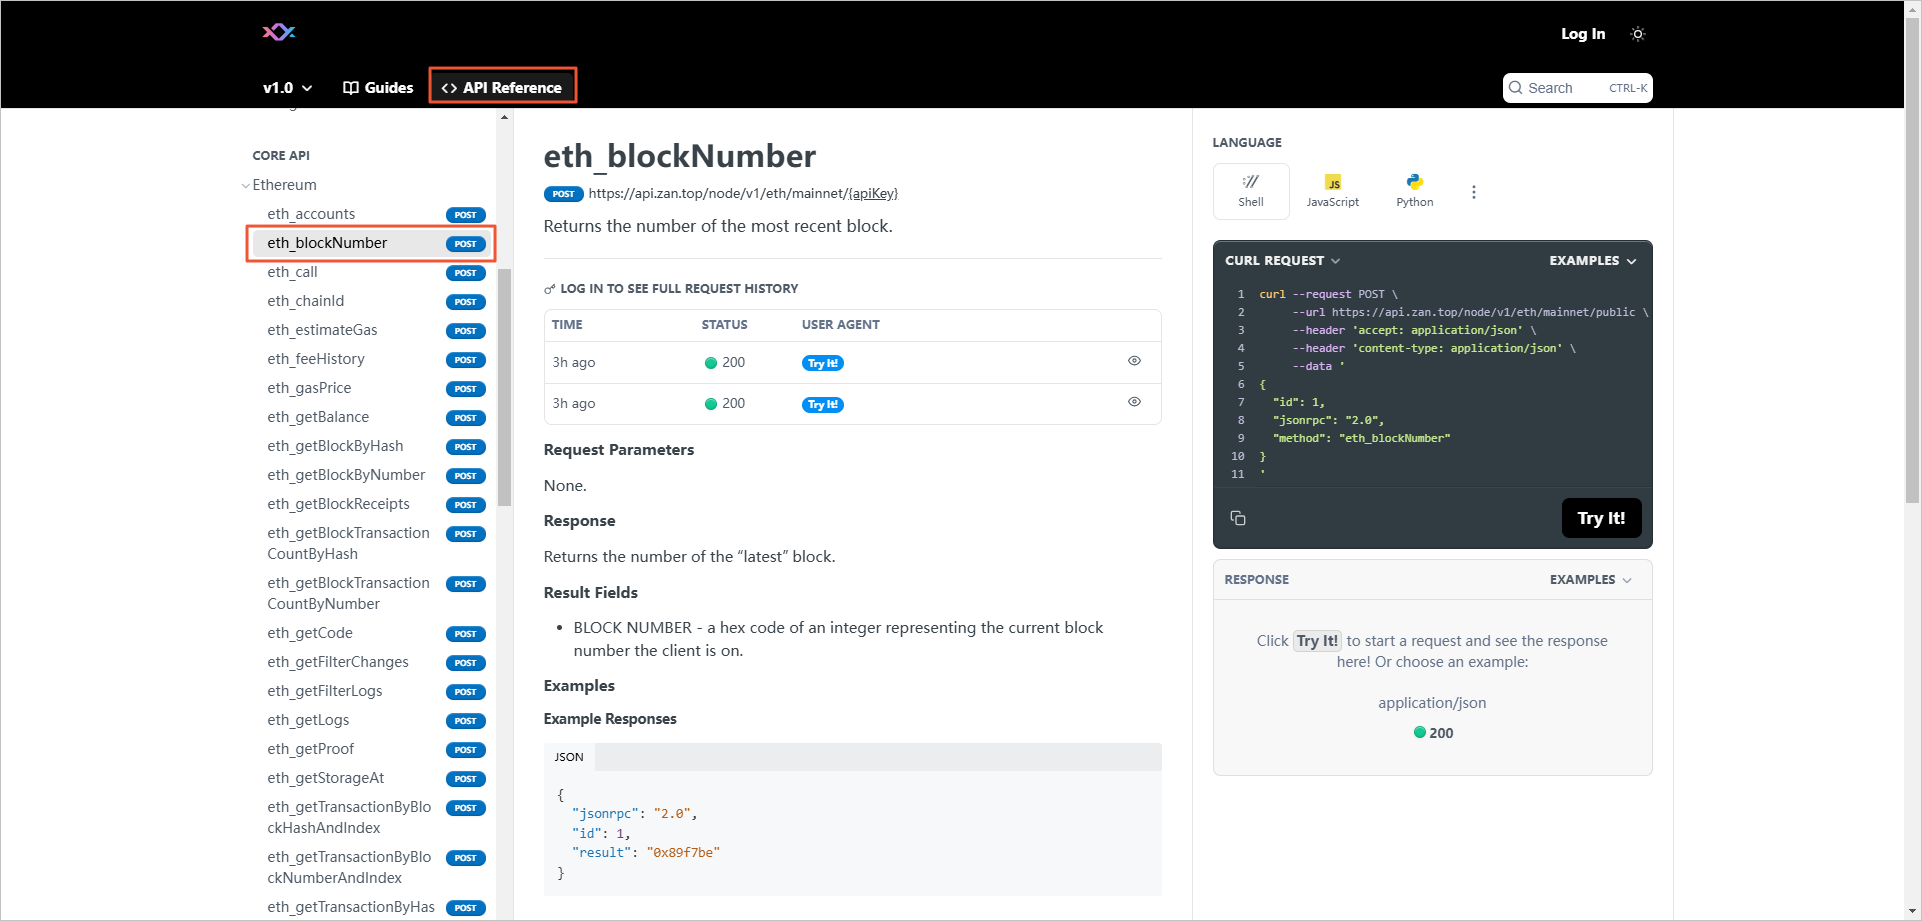
-
Path Params → Paste your API key into the parameter value.
The platform provides a free public parameter value for verifying the API interface, but this value is only suitable for low Credit consumption interface calls. For high consumption interface calls, you need to use the API key.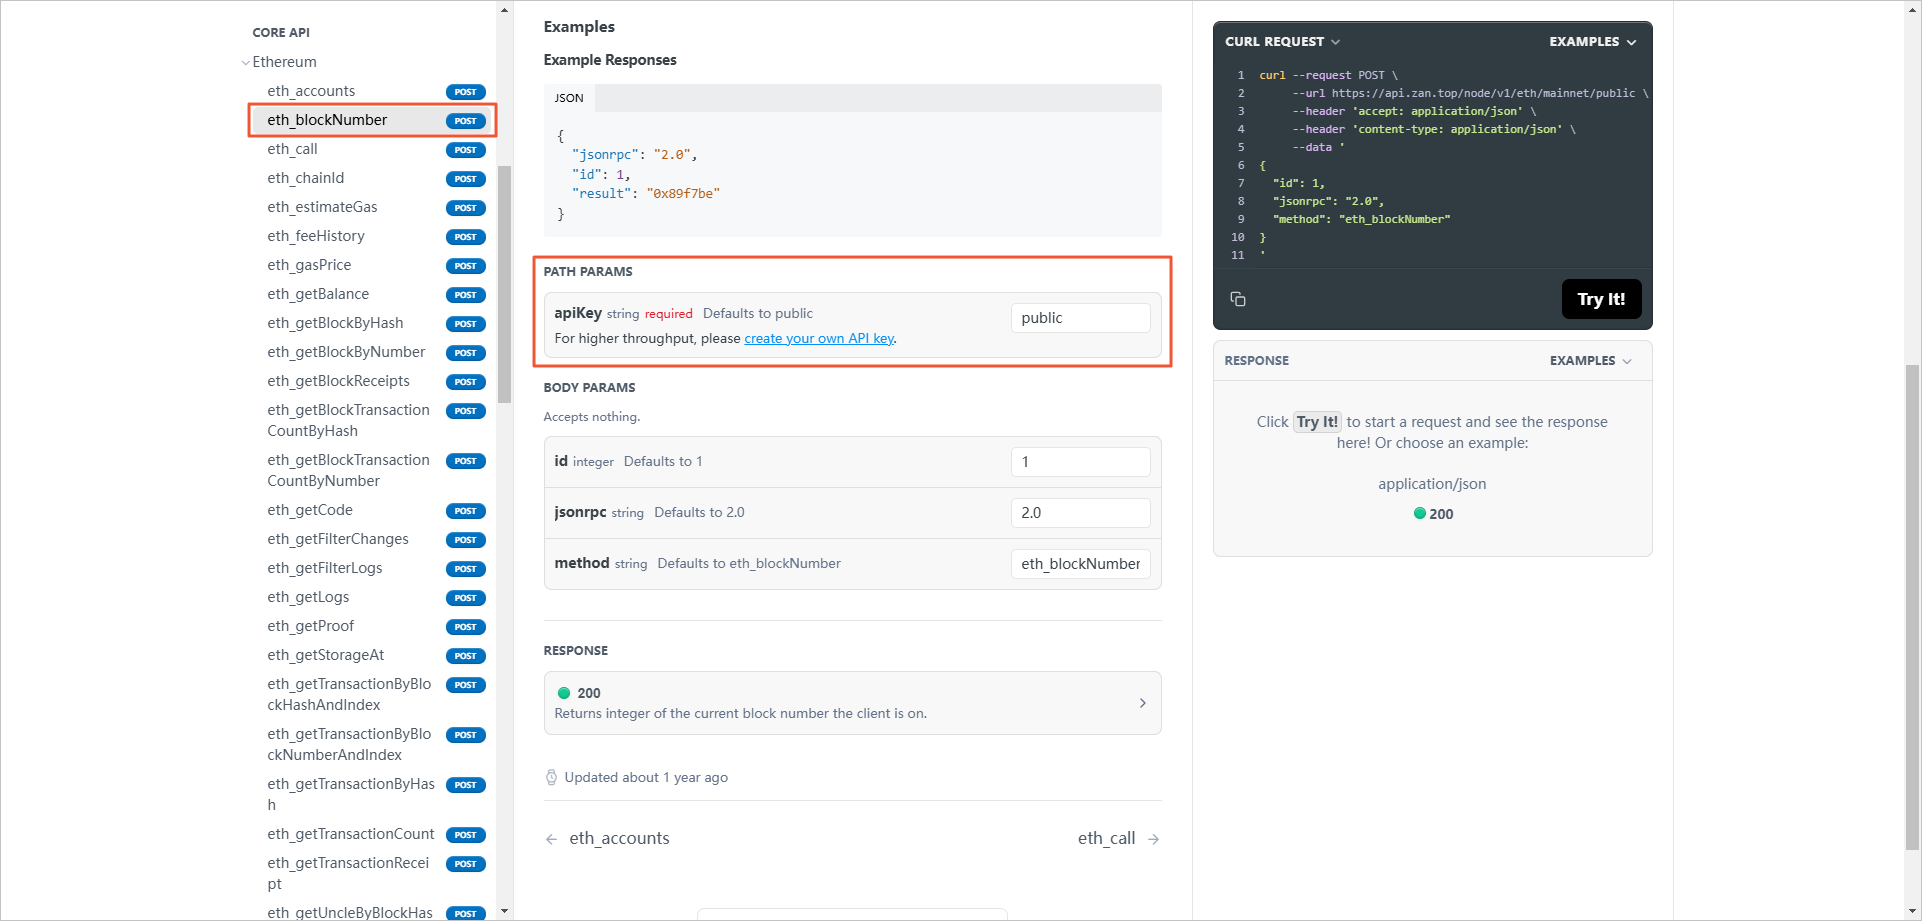
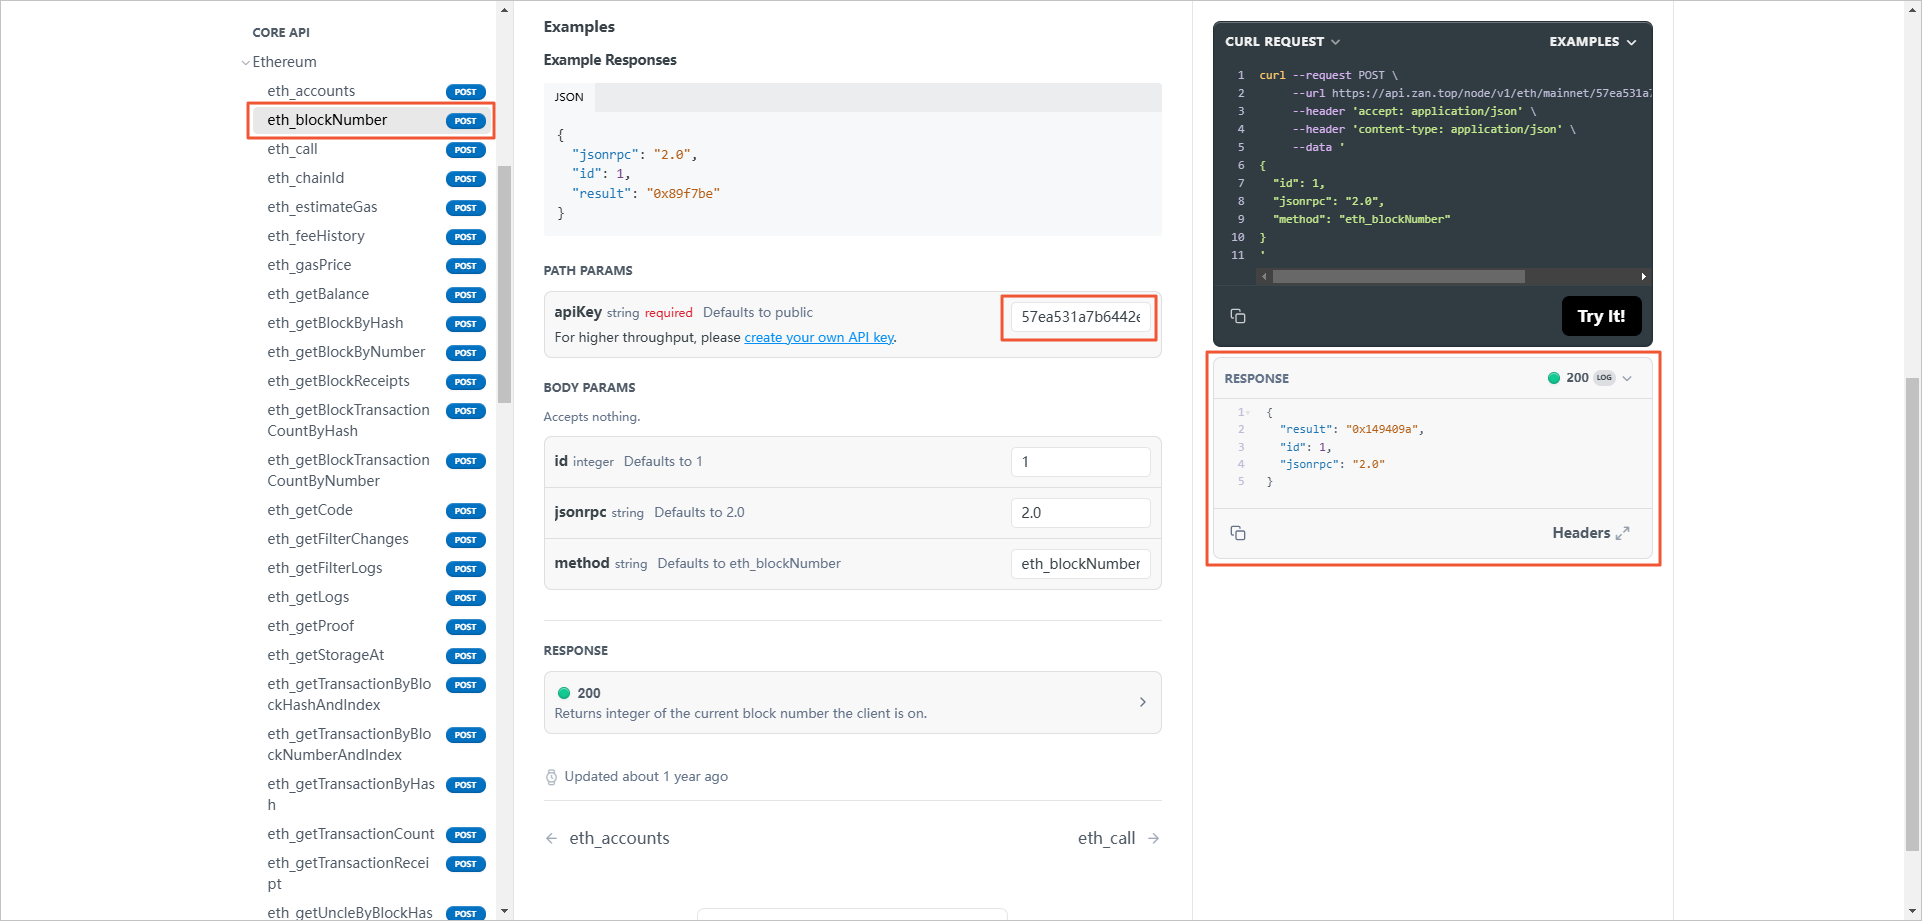
-
Click Try it on the right side of the page, and you will see the successful return value of the call in the RESPONSE window below.
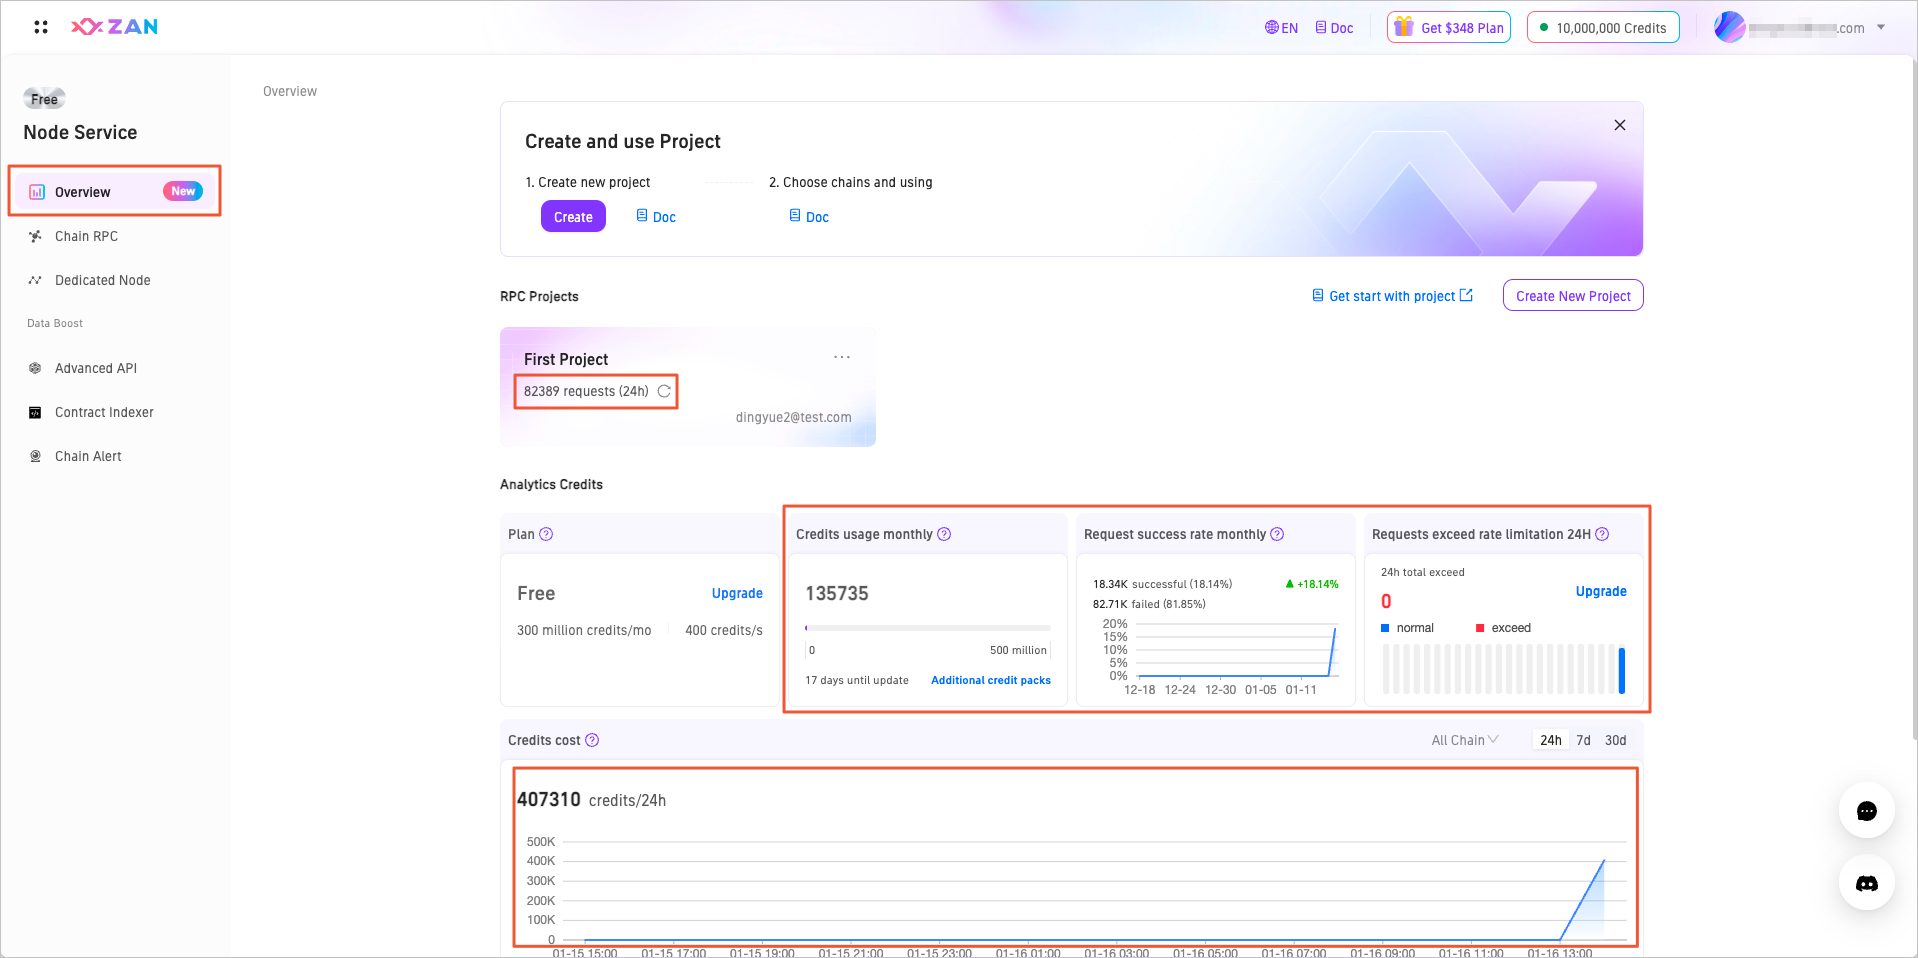
Step3: View Credits Cost
The free plan includes a default of 150 million credits, valid for 30 days. Except for rate limit errors returned by the interface, each time you make an API call with your API key, you can view the specific credit usage details and monitor the remaining available credits in real-time on the overview page of the node service.
| No. | Information | Description |
|---|---|---|
| 1 | Chain RPC | By default, display the three most recently used projects. Click Unfold / Fold to expand or collapse additional projects. |
| 2 | Plan | Show current plan details, such as included credits and the upper limit of credits that can be consumed per second. |
| 3 | Credits usage monthly | Display the current plan's credit usage and remaining availability for the month. |
| 4 | Request success rate monthly | Display the request success rate for the month. Hovering over specific points will show the number of successful and failed requests for that day.
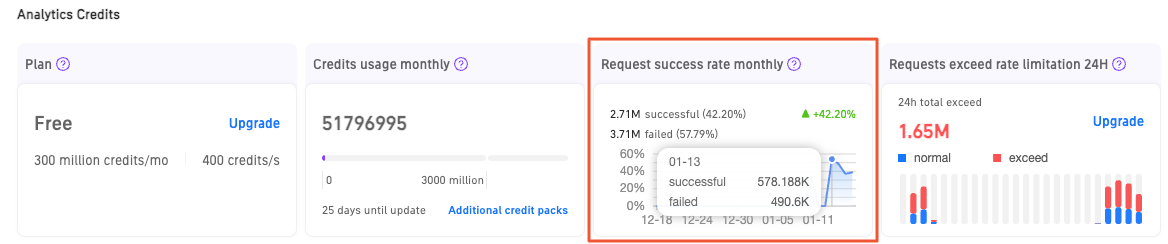
|
| 5 | Request exceed rate limitation 24H | Display data of requests that exceeded the credits limit within 24 hours. When hovering over a specific time bar, you can see the number of normal requests and the number of requests that exceeded the credits limit for that hour.

|
| 6 | Credits cost | Analyze the recent usage of credits. The top right corner offers a toggle function to view credit usage based on different blockchain dimensions, with the default setting displaying credit usage across all blockchains. Additionally, users can select to view data from the past 24 hours, past 7 days, or past 30 days. |
| 7 | Docs | Provide links to quick start and credits consumption documentation, along with frontend tutorials to help you quickly utilize node service features. |
More introduction
The Get Started tab provides the following information:

| No. | Operation | Description |
|---|---|---|
| 1 | Switching projects | Click the dropdown button on the right side of the project to switch and view other projects. You can also click Create New Project in the dropdown to create a new project, see Manage projects > Create a new project. |
| 2 | Chains | By switching the blockchain options at the top of the page, view network information of different blockchains. By default, Ethereum blockchain information is displayed. The platform now supports over 22 blockchains and will support more EVM-compatible and other blockchains in the future. |
| 3 | Faucet | If the selected blockchain supports the faucet feature, click Faucet to jump to the faucet page of the corresponding blockchain. Currently, only Ethereum and Solana supports this feature. |
| 4 | API reference | Click API reference to navigate to the API reference documentation for the current blockchain. |
| 5 | SDK | Click SDK to navigate to the SDK documentation for Node Service. |
| 6 | Code example | Click Code example to view all supported methods on the current chain and their usage examples in different programming languages in a popup, with a one-click code copy function.
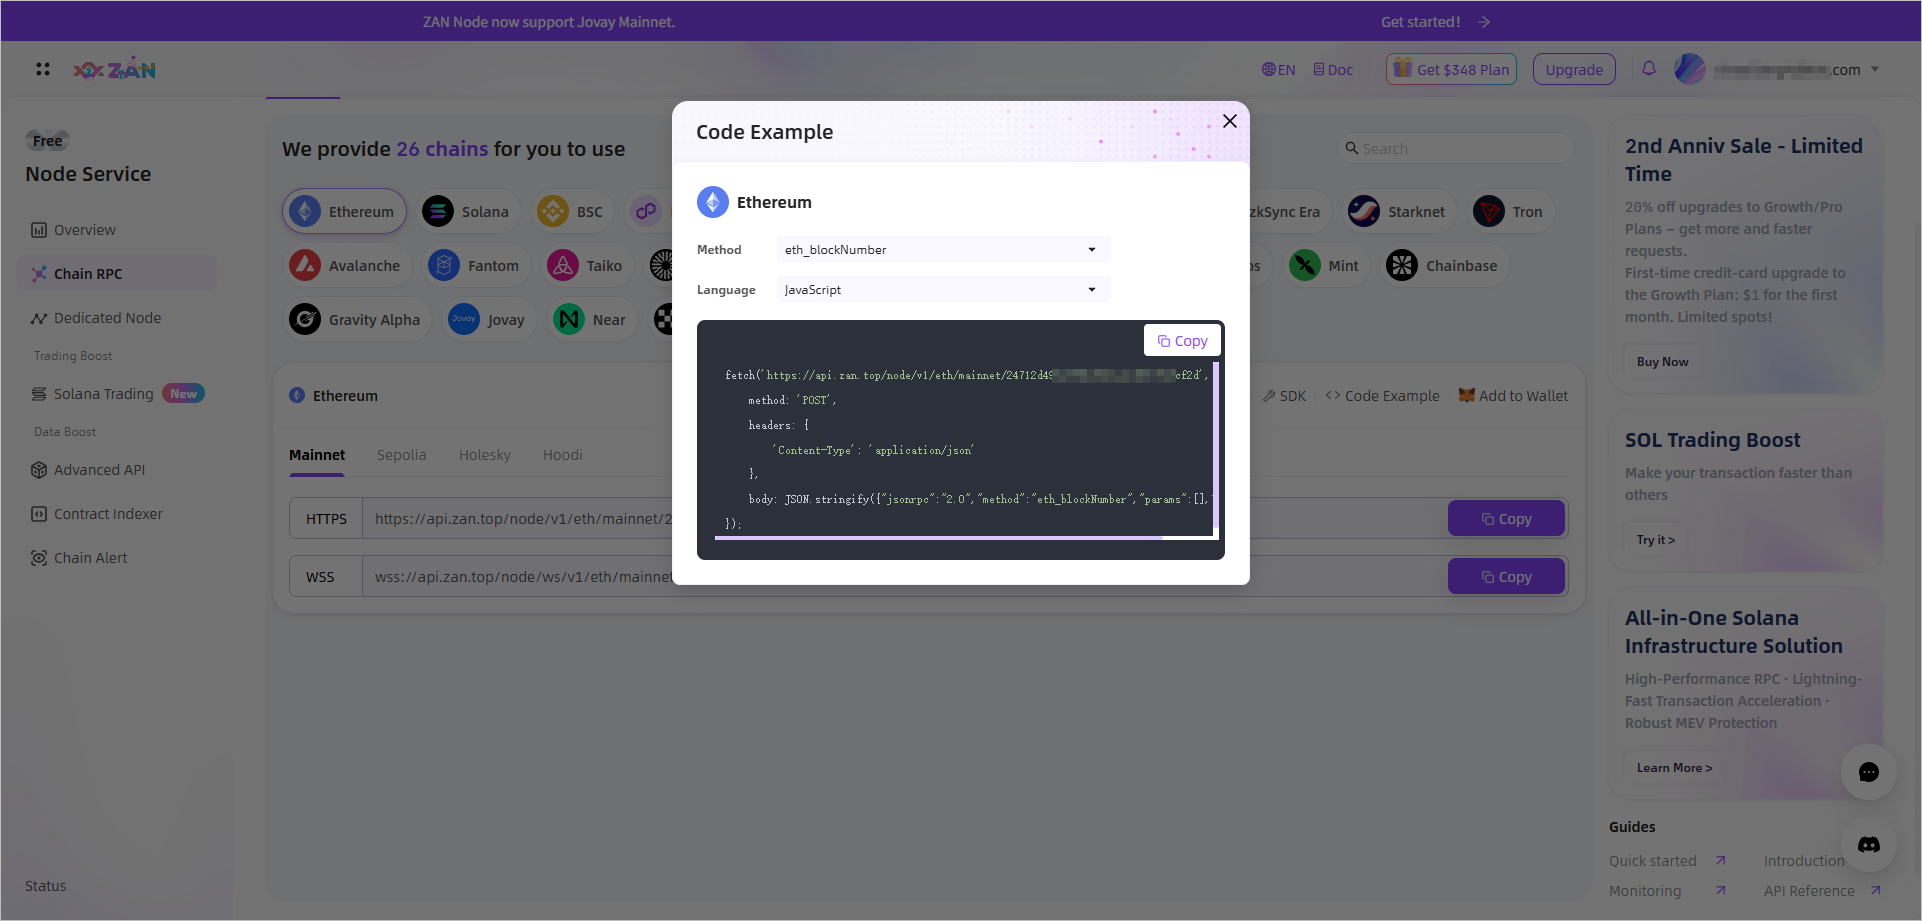
|
| 7 | Add to Wallet | Click Add to Wallet to add the custom RPC node of the current blockchain network to MetaMask. For detailed steps, refer to Adding RPC nodes to MetaMask. |
| 8 | URLs | To help you quickly obtain request URLs across different networks on various blockchains, the platform automatically generates URLs containing API Keys for you, and provides HTTPS and WSS connection methods.
|
| 9 | Latest updates | Provides notifications of new product features or operational advertisements, helping you stay informed about the latest product developments. |
Next steps
- Create Projects → Create multiple API keys to isolate applications and secure production.
- Security Settings → Project-level API key security control with whitelists, rate limits, and access restrictions.
- Project-level Monitoring → Track credit consumption, request volume, activity status, and request origins.
- Collaboration Settings → Member role permissions assignment for cross-project access isolation.
Related
- API Reference → Full endpoint documentation, authentication methods, and multi-language code examples.
- Error Codes → Common error codes, causes, and troubleshooting steps.
- Batch Requests → Send multiple JSON-RPC calls in a single HTTP request.
Updated 3 months ago